I absolutely love how this simple roasted cauliflower with feta comes together in under 40 minutes and tastes like you spent hours in the kitchen. The combination of caramelized vegetables and tangy cheese works beautifully alongside grain bowls, or you could serve it as a side to your protein of choice. It pairs wonderfully with dishes like Sheet Pan Italian Chicken or Slow Cooker Chicken Curry for a complete meal.
How I Discovered My New Favorite Vegetable Side Dish
Last spring, I was visiting my sister in Boston, and we stopped at a farmers market near the waterfront. She grabbed a beautiful head of cauliflower, and I’ll admit—I was skeptical. I’ve never been the biggest cauliflower fan, but she insisted we roast it Mediterranean-style with feta and lemon.
I watched her toss those florets with olive oil and oregano, and something just clicked. When they came out of the oven, golden and slightly charred at the edges, I took one bite and realized I’d been missing out. The roasting brought out this natural sweetness I’d never noticed before. The feta added creaminess, the lemon brightened everything up, and fresh herbs tied it all together. That afternoon changed how I think about cooking with vegetables.
Now I make this recipe at least twice a month, and honestly, it’s become one of my go-to sides when I need something nutritious, impressive, and genuinely delicious.
What is Cauliflower Feta Recipe?
This is a Mediterranean-inspired roasted vegetable dish that celebrates simplicity and quality ingredients. You take fresh cauliflower florets, roast them until they’re golden and tender, then finish with crumbly feta cheese, fresh herbs, bright lemon juice, and a drizzle of good olive oil.
The beauty of this recipe is that it comes from the Mediterranean tradition of letting each ingredient shine without unnecessary complexity. Roasting brings out the natural sugars in the cauliflower, creating caramelized edges that are absolutely irresistible. It’s naturally vegetarian, works as a main course or side dish, and honestly, it’s the kind of food that makes healthy eating feel effortless.
Why You’ll Love This Cauliflower Feta Recipe
- Ready in under 40 minutes – Most of this is hands-off oven time, so you can prep other parts of your meal or just relax while it cooks.
- Minimal ingredients – Just eight ingredients, and you probably have most of them on hand already. No fancy shopping required.
- Works for any diet – It’s vegetarian, naturally gluten-free, keto-friendly, and fits into Mediterranean eating patterns. Everyone at your table will enjoy it.
- Seriously nutritious – Cauliflower is packed with vitamin C, fiber, and antioxidants, while feta adds protein and calcium. This isn’t health food that tastes like punishment.
- Tastes restaurant-quality – The combination of roasting, fresh herbs, and lemon juice makes this feel way fancier than it actually is.
- Customizable – Swap herbs based on what you have, adjust seasonings to your taste, and add extra vegetables if you want.
The Ingredients
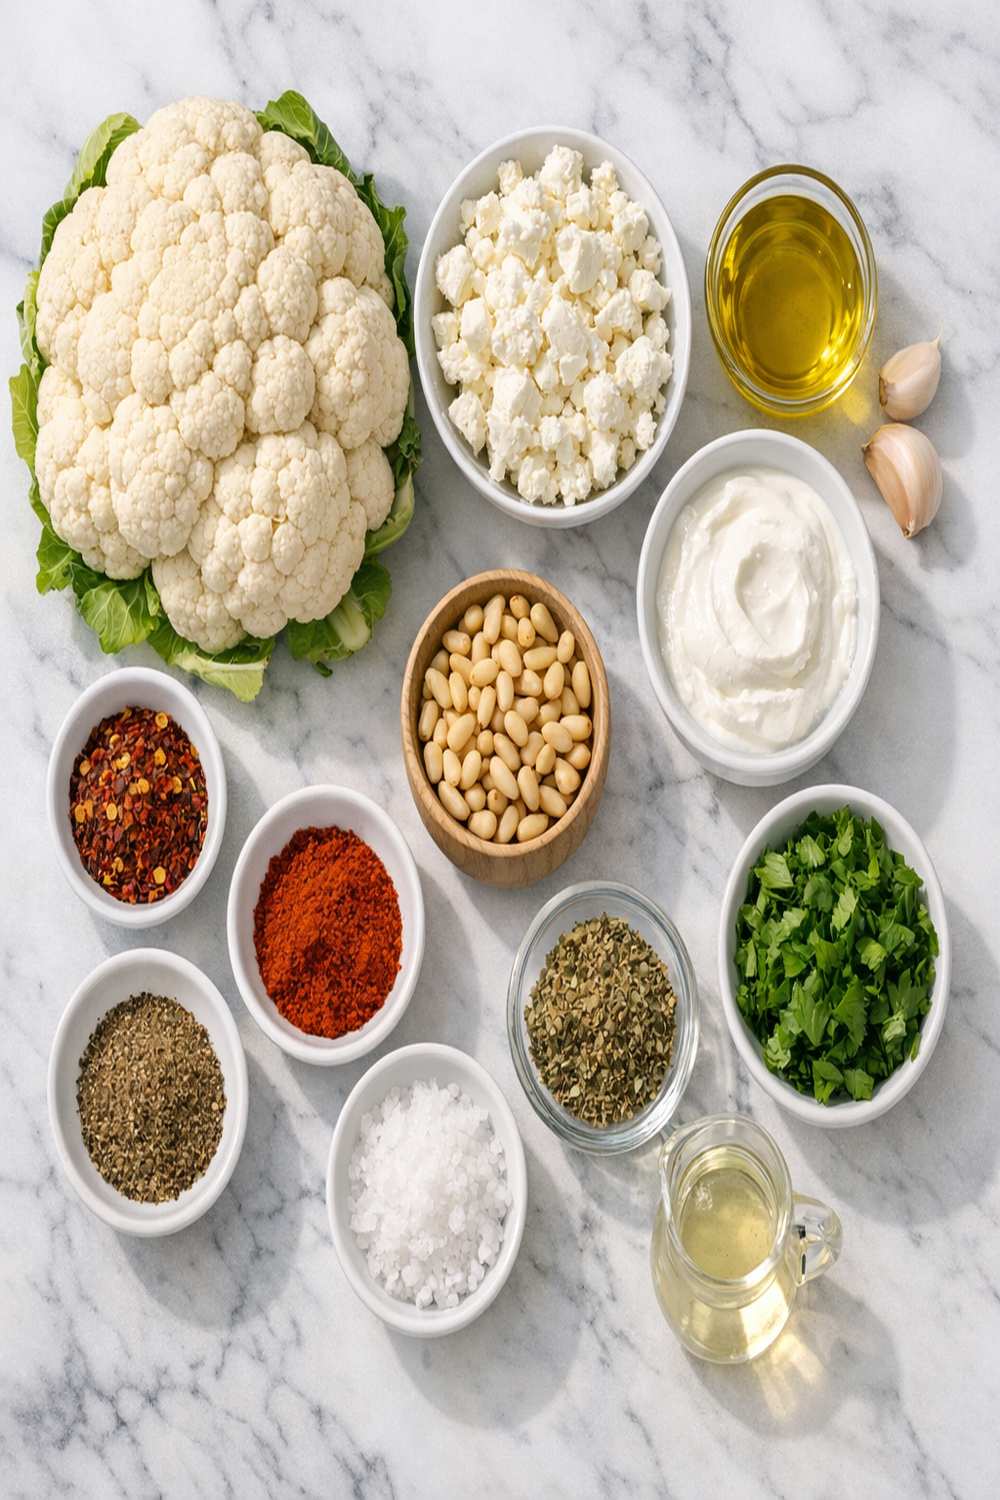
This recipe uses whole, recognizable ingredients that work together beautifully. Most of these are pantry staples, and if you don’t already have quality olive oil and fresh lemon at home, investing in them will change your cooking across the board.
- 4 tablespoons extra-virgin olive oil (divided into 2 tablespoons for roasting and 2 for finishing)
- 1 teaspoon garlic powder (or substitute ½ teaspoon minced fresh garlic)
- ½ teaspoon red pepper flakes (optional, for a gentle heat)
- 1 head cauliflower (cut into bite-sized florets, about 2 pounds or 3-4 cups)
- 2 ounces crumbled feta cheese (about ½ cup, preferably a good quality variety)
- 1 lemon (for both zest and juice, about 1 tablespoon zest and 2 tablespoons juice)
- 2 tablespoons fresh herbs (dill, mint, basil, or a combination—whatever you have available)
- ¼ teaspoon freshly cracked black pepper (or to taste)
- 1 teaspoon dried oregano (or use fresh if you have it—use about 1 tablespoon fresh)
- ½ teaspoon kosher salt (adjust based on your feta saltiness and personal preference)
How to Make Cauliflower Feta Recipe?
The process is straightforward and forgiving. I’m going to walk you through each step, but honestly, this is one of those recipes where you can’t really mess it up. Let’s get started.
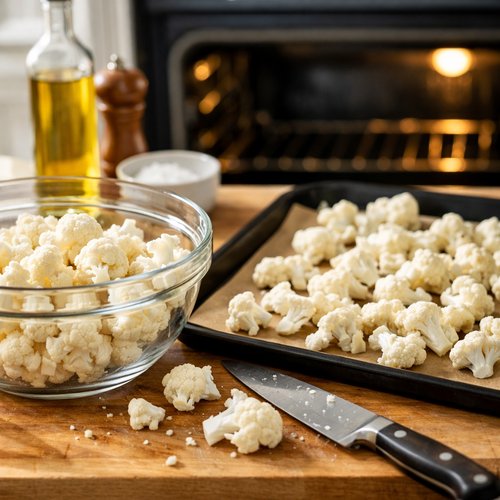
Step 1: Heat Your Oven and Prep the Cauliflower
Start by preheating your oven to 425 degrees Fahrenheit. This high heat is what creates those beautiful, crispy edges on the cauliflower. While the oven heats up, wash your cauliflower head and cut it into florets. I like them about 1½ to 2 inches in size—big enough that they stay intact during roasting but small enough to cook through evenly.
Spread the florets out on a rimmed baking sheet. This is important—if they’re crowded together, they’ll steam instead of roast. Give them some breathing room.
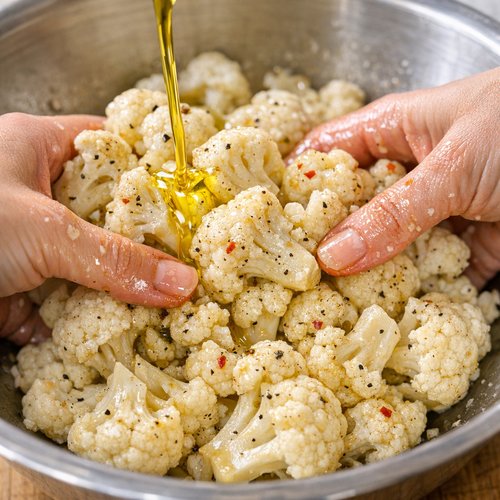
Step 2: Dress the Cauliflower with Oil and Seasonings
Pour 2 tablespoons of your best extra-virgin olive oil over the cauliflower florets. I use my hands for this step because it’s faster and you can feel when everything is evenly coated. Sprinkle the oregano, garlic powder, and lemon zest over top. Add the kosher salt and black pepper to taste.
Toss everything together gently but thoroughly, making sure each floret gets coated with oil and seasonings. This is where the flavor begins. The lemon zest will stick to the oil and distribute across every piece, and the oregano and garlic will become fragrant as they roast.
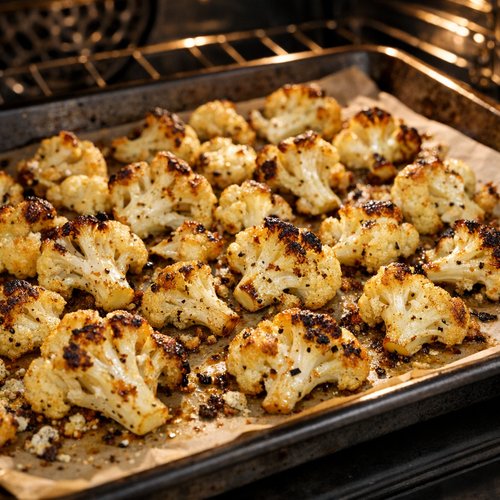
Step 3: Roast Until Golden and Tender
Spread the cauliflower out in a single layer on your baking sheet and place it in the preheated oven. Set a timer for 12-15 minutes, then give the pan a shake or toss the florets with a spatula to ensure even browning. This prevents any from burning on the bottom while others stay pale.
Continue roasting for another 10-15 minutes until the cauliflower is golden brown with some crispy, darker edges and completely tender when pierced with a fork. The florets should have a slight caramelized sweetness to them—that’s when you know it’s done. Don’t rush this step. The browning is where all the flavor magic happens.
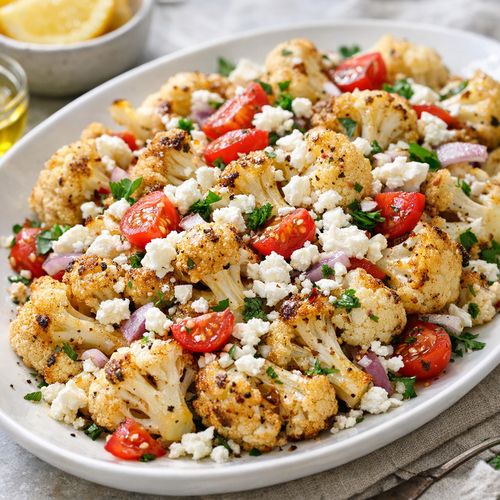
Step 4: Finish with Fresh Toppings and Serve
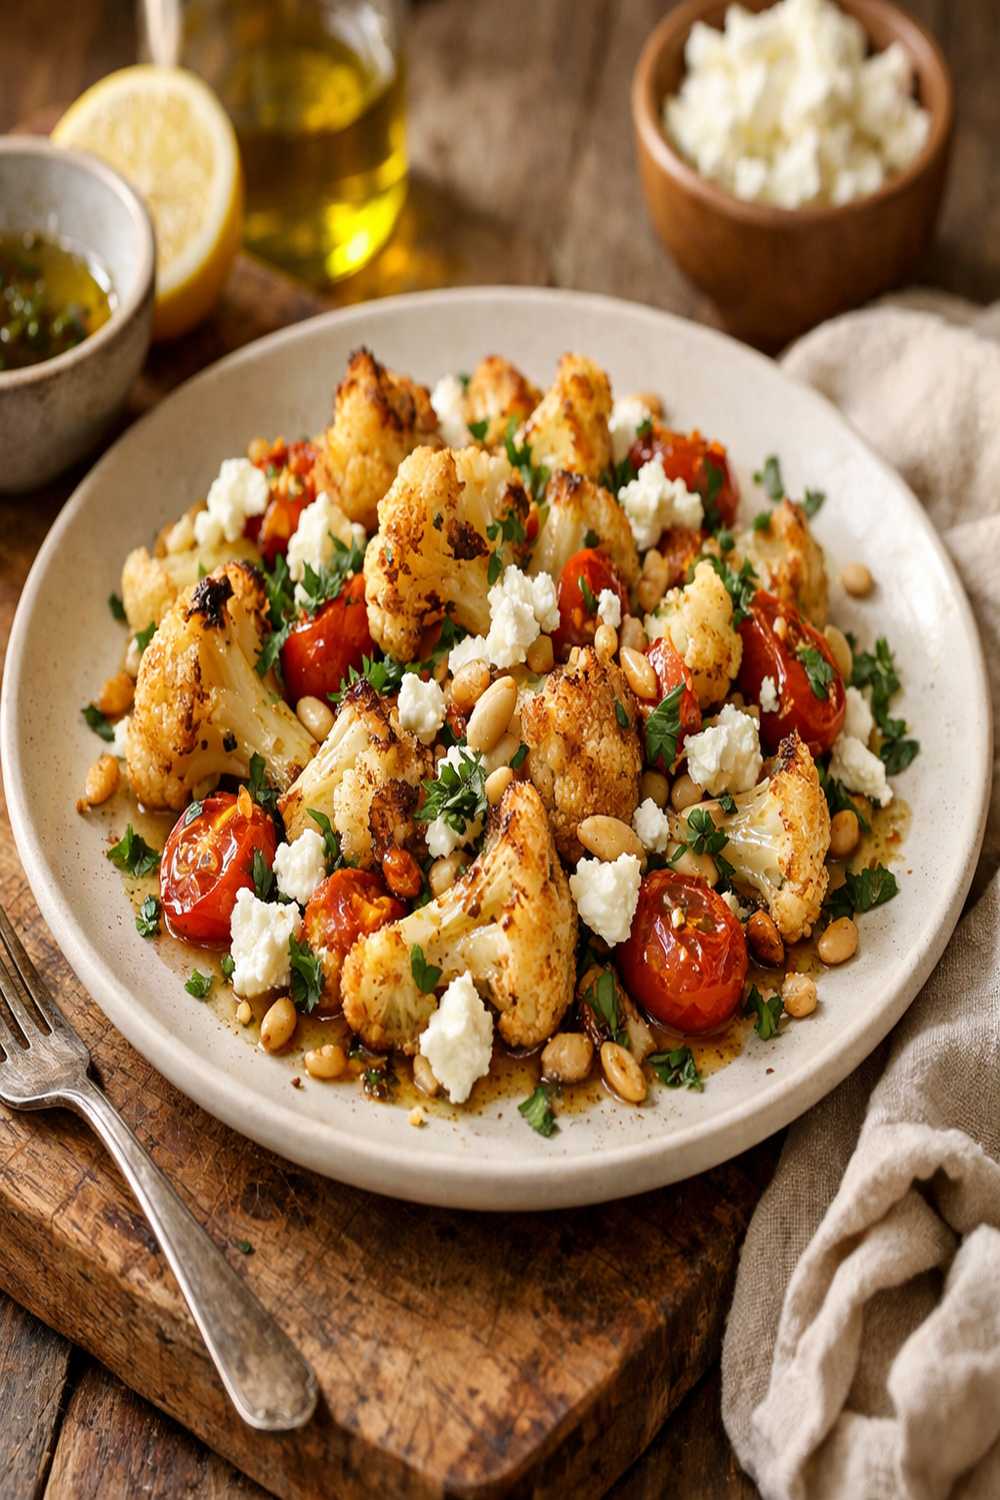
Transfer the warm cauliflower to a serving platter or divide among plates. Sprinkle the crumbled feta cheese over the top while it’s still warm—the heat softens it slightly and brings out its tanginess. Scatter your fresh herbs (dill, mint, basil, or whatever combination you chose) generously across the dish.
Squeeze fresh lemon juice over everything, then drizzle with the remaining 2 tablespoons of olive oil. If you’re using the red pepper flakes, sprinkle them on now. Take a moment to appreciate how good this looks, then serve immediately while it’s still warm.
Expert’s Nutritional Tip
Here’s something I always tell my clients: the combination of fat (from the olive oil and feta) with the vegetables in this dish is actually what makes the nutrients more bioavailable. Cauliflower contains fat-soluble vitamins like vitamin K, and when you pair it with olive oil and feta, your body absorbs those vitamins better than if you ate the cauliflower plain.
Plus, the feta provides about 4 grams of protein per ounce, which helps with satiety. This isn’t just a vegetable side—it’s a complete, satisfying dish that keeps you full.
Tips and Tricks
- Don’t skip the second toss – Halfway through roasting, give the pan a shake or toss the florets. This prevents any from burning on the bottom and ensures even caramelization on all sides.
- Use really good olive oil – Since it’s such a simple recipe, quality matters. Splurge on a bottle of extra-virgin olive oil you actually enjoy tasting. It makes a real difference.
- Fresh herbs matter – Fresh herbs are totally worth using here instead of dried. They add brightness that dried herbs can’t match. Dill is my favorite, but mint is wonderful too.
- Don’t overcrowd the pan – If your cauliflower is packed tightly, it’ll steam instead of roast. Use two baking sheets if needed.
- Taste as you season – Feta is already salty, so taste before adding additional salt. You might need less than the recipe calls for depending on your feta brand.
- Add extras if you like – Sun-dried tomatoes, pine nuts, chickpeas, or sliced red onions all work beautifully in this dish.
Make-Ahead Guide
I love this recipe because it works at almost every stage of preparation. Here’s how to plan ahead based on your schedule:
Two days ahead: Wash and cut your cauliflower, store it in an airtight container in the fridge. Zest and juice your lemon, keeping the juice in a small container.
The morning of: If you’re making this for dinner, you could toss the cauliflower with oil and seasonings in the morning, cover the baking sheet with plastic wrap, and refrigerate. Just add 5-10 minutes to the roasting time since it’ll start from a colder temperature.
Just before serving: The roasting, topping, and finishing happen right before you eat. This is important because the warmth of the cauliflower brings out the flavors and softens the feta slightly.
Leftovers reheat beautifully. I cover them and pop them back in a 350-degree oven for about 10 minutes, then add fresh herbs and a squeeze of lemon again before eating. They’re also surprisingly good at room temperature the next day—perfect for lunch bowls.
Common Mistakes to Avoid
- Overcrowding the baking sheet – This is the number one issue. The cauliflower needs space to roast, not steam. If your pan is packed, you’ll end up with steamed florets instead of golden, caramelized ones.
- Using low heat – I know 425 degrees seems high, but it’s essential for browning. If you roast at 375 degrees, you’ll get soft cauliflower but no caramelization, and that’s where the flavor comes from.
- Not tossing halfway through – Set a timer. Seriously. The cauliflower on the bottom of the pan will brown faster than the top, and tossing prevents burning while ensuring even cooking.
- Skipping the lemon juice at the end – I’ve seen people complete this dish and forget the fresh lemon squeezed over top. That bright acid is essential—it wakes up all the other flavors and prevents everything from tasting flat.
Seasonal Variations
Spring: Swap some fresh dill for other herbs, and add a handful of fresh peas to the pan about 5 minutes before the cauliflower finishes roasting. They’ll warm through beautifully.
Summer: Add diced cherry tomatoes and fresh basil after roasting. You could also toss in some crumbled fresh goat cheese alongside the feta for a creamier texture.
Fall: Add cubed butternut squash or diced beets to the pan from the start. They’ll roast alongside the cauliflower and add sweetness and earthiness. Swap mint for rosemary.
Winter: Roast the cauliflower with pomegranate molasses or balsamic vinegar instead of plain lemon juice. Top with pomegranate seeds and pistachios for color and crunch.
Can I Store Cauliflower Feta Recipe?
Yes, and it’s one of the reasons I love making this recipe. Store cooled leftovers in an airtight container in the refrigerator for up to 4 days. The cauliflower keeps well, though the texture becomes softer by day three.
I don’t recommend freezing this dish because the feta texture changes when thawed, and the fresh herbs lose their appeal. However, you can definitely freeze just the roasted cauliflower (without toppings) for up to 3 months. Thaw it in the fridge and add fresh feta, herbs, and lemon juice when you’re ready to eat it.
The best way to store is in the coldest part of your fridge, and if you’re eating it cold the next day, add fresh lemon juice and herbs just before serving to brighten the flavors.
Nutrition Information
This recipe yields about 4 servings as a side dish or 2-3 servings as a main course. Per serving (based on 4 servings), this dish contains approximately 180 calories, 12 grams of fat, 13 grams of carbohydrates, 4 grams of fiber, 6 grams of protein, and 380 milligrams of sodium.
The nutritional profile is based on USDA data for raw cauliflower, olive oil, and feta cheese. One head of raw cauliflower contains about 25 grams of protein and is an excellent source of vitamin C (providing about 77% of your daily needs), vitamin K, and folate. The olive oil adds heart-healthy monounsaturated fats, and the feta provides calcium and additional protein.
This is a genuinely nutrient-dense side dish that supports healthy digestion, bone health, and stable blood sugar when paired with a protein source and whole grains.
What Can I Serve With Cauliflower Feta Recipe?
This dish is flexible enough to work with almost any protein or grain. The Mediterranean flavors pair beautifully with chicken, fish, legumes, or grains. Here are some of my favorite combinations:
- With grains: Serve over warm quinoa, farro, or wild rice for a complete vegetarian meal. The roasted cauliflower’s flavors complement the nutty grain perfectly.
- With lean proteins: Pair it alongside Sheet Pan Italian Chicken for an easy weeknight dinner with minimal cleanup.
- With plant-based mains: Combine with Bean Rice Cheese Burrito for a hearty, protein-packed meal that’s completely vegetarian.
- With fish: Serve alongside grilled salmon or white fish. The lemon flavors tie everything together beautifully.
- As a lunch bowl: Layer it over greens with some chickpeas, cucumber, and tahini dressing for a complete, portable meal.
- With other roasted vegetables: Combine with Roasted Broccolini or Air Fryer Asparagus for a colorful vegetable medley.
Substitutes
- Different cheeses: Swap feta for crumbled goat cheese, ricotta salata, or even aged pecorino romano. Each brings different flavors but maintains that tangy, crumbly texture.
- Fresh herbs variations: If you don’t have dill, mint, and basil, use parsley, cilantro, or oregano. Even a single herb works—don’t feel locked into one combination.
- Lemon alternatives: Lime juice works beautifully if you want a slightly different flavor profile. So does white wine vinegar or sherry vinegar, though the taste will be more acidic.
- Other vegetables: Broccoli, romanesco, Brussels sprouts halves, or even cauliflower’s cousin—broccolini—all work with the same preparation method and seasoning.
- Oil substitutions: While I prefer extra-virgin olive oil, you could use a quality vegetable oil or avocado oil, though the flavor won’t be quite as rich.
Cauliflower Feta Recipe
Ingredients
- 4 tablespoon extra-virgin olive oil divided into 2 tablespoons for roasting and 2 for finishing
- 1 teaspoon garlic powder or substitute ½ teaspoon minced fresh garlic
- ½ teaspoon red pepper flakes optional, for a gentle heat
- 1 head cauliflower cut into bite-sized florets, about 2 pounds or 3-4 cups
- 2 ounce crumbled feta cheese about ½ cup, preferably a good quality variety
- 1 lemon for both zest and juice, about 1 tablespoon zest and 2 tablespoons juice
- 2 tablespoon fresh herbs (dill, mint, basil, or a combination
- ¼ teaspoon freshly cracked black pepper or to taste
- 1 teaspoon dried oregano (or use fresh if you have it
- ½ teaspoon kosher salt adjust based on your feta saltiness and personal preference
Instructions
Step 1: Heat Your Oven and Prep the Cauliflower
- Start by preheating your oven to 425 degrees Fahrenheit. This high heat is what creates those beautiful, crispy edges on the cauliflower. While the oven heats up, wash your cauliflower head and cut it into florets. I like them about 1½ to 2 inches in size—big enough that they stay intact during roasting but small enough to cook through evenly. Spread the florets out on a rimmed baking sheet. This is important—if they're crowded together, they'll steam instead of roast. Give them some breathing room.

Step 2: Dress the Cauliflower with Oil and Seasonings
- Pour 2 tablespoons of your best extra-virgin olive oil over the cauliflower florets. I use my hands for this step because it's faster and you can feel when everything is evenly coated. Sprinkle the oregano, garlic powder, and lemon zest over top. Add the kosher salt and black pepper to taste. Toss everything together gently but thoroughly, making sure each floret gets coated with oil and seasonings. This is where the flavor begins. The lemon zest will stick to the oil and distribute across every piece, and the oregano and garlic will become fragrant as they roast.

Step 3: Roast Until Golden and Tender
- Spread the cauliflower out in a single layer on your baking sheet and place it in the preheated oven. Set a timer for 12-15 minutes, then give the pan a shake or toss the florets with a spatula to ensure even browning. This prevents any from burning on the bottom while others stay pale. Continue roasting for another 10-15 minutes until the cauliflower is golden brown with some crispy, darker edges and completely tender when pierced with a fork. The florets should have a slight caramelized sweetness to them—that's when you know it's done. Don't rush this step. The browning is where all the flavor magic happens.

Step 4: Finish with Fresh Toppings and Serve
- Transfer the warm cauliflower to a serving platter or divide among plates. Sprinkle the crumbled feta cheese over the top while it's still warm—the heat softens it slightly and brings out its tanginess. Scatter your fresh herbs (dill, mint, basil, or whatever combination you chose) generously across the dish. Squeeze fresh lemon juice over everything, then drizzle with the remaining 2 tablespoons of olive oil. If you're using the red pepper flakes, sprinkle them on now. Take a moment to appreciate how good this looks, then serve immediately while it's still warm.

Notes
Nutrition
FAQs
Can I use frozen cauliflower for this recipe?
You can, but I don’t recommend it as your first choice. Frozen cauliflower has already been blanched and contains more moisture, which makes it harder to achieve that beautiful golden-brown caramelization. If you do use frozen, thaw it completely and pat it very dry with paper towels before roasting. You might also need to reduce the roasting time by 5-10 minutes since it’s already partially cooked.
What if I don’t like feta cheese?
This dish is wonderfully customizable! Try crumbled goat cheese for a tangier option, ricotta salata for a nuttier flavor, or even shaved parmesan for something more savory. You could also skip the cheese entirely and add roasted chickpeas for protein and crunch instead. The roasted cauliflower itself is delicious with just the herbs, lemon, and olive oil.
Can I make this in an air fryer?
Absolutely! Toss your seasoned cauliflower florets in the air fryer basket and cook at 400 degrees Fahrenheit for about 12-15 minutes, shaking the basket halfway through. The air fryer actually creates even more caramelization than the oven because of the circulating heat. Top it with feta and fresh herbs afterward, just like the oven version.
How do I know when the cauliflower is perfectly roasted?
You’re looking for florets that are golden brown with some deeper caramelized spots on the edges, and the pieces should be tender when pierced with a fork but still hold their shape. The whole process takes about 25-30 minutes at 425 degrees. If you’re unsure, pull one floret out and taste it. If it’s sweet and caramelized, everything’s ready.
Can I prepare this ahead for entertaining?
Yes, with a small caveat. You can prep the cauliflower and seasonings hours ahead. About 30 minutes before your guests arrive, roast it so it comes out of the oven warm and fresh. Add the feta, fresh herbs, lemon juice, and final olive oil drizzle right before serving. Serving it warm is really what makes this dish special, so timing the roasting for just before your meal is ideal.
More Recipes You’ll Love
- Sheet Pan Italian Chicken – A one-pan dinner that comes together in 35 minutes with roasted vegetables and tender chicken
- Roasted Broccolini – Another simple roasted vegetable side that’s just as impressive as this cauliflower
- Slow Cooker Chicken Curry – A warm, aromatic main dish that pairs beautifully with roasted vegetable sides
- Bean Rice Cheese Burrito Recipe – A hearty vegetarian option that makes cauliflower feel like part of something bigger
This roasted cauliflower with feta recipe has genuinely changed how I think about vegetable sides. It’s proof that you don’t need complicated techniques or extensive ingredient lists to create something that tastes restaurant-quality. My sister was right that spring day at the farmers market—simple ingredients treated with care create magic.
I hope you make this soon. I’d love to hear how it turns out for you and what variations you love best. Whether you serve it warm from the oven or toss it into a lunch bowl the next day, I promise you’ll be reaching for this recipe again and again.
Happy cooking!