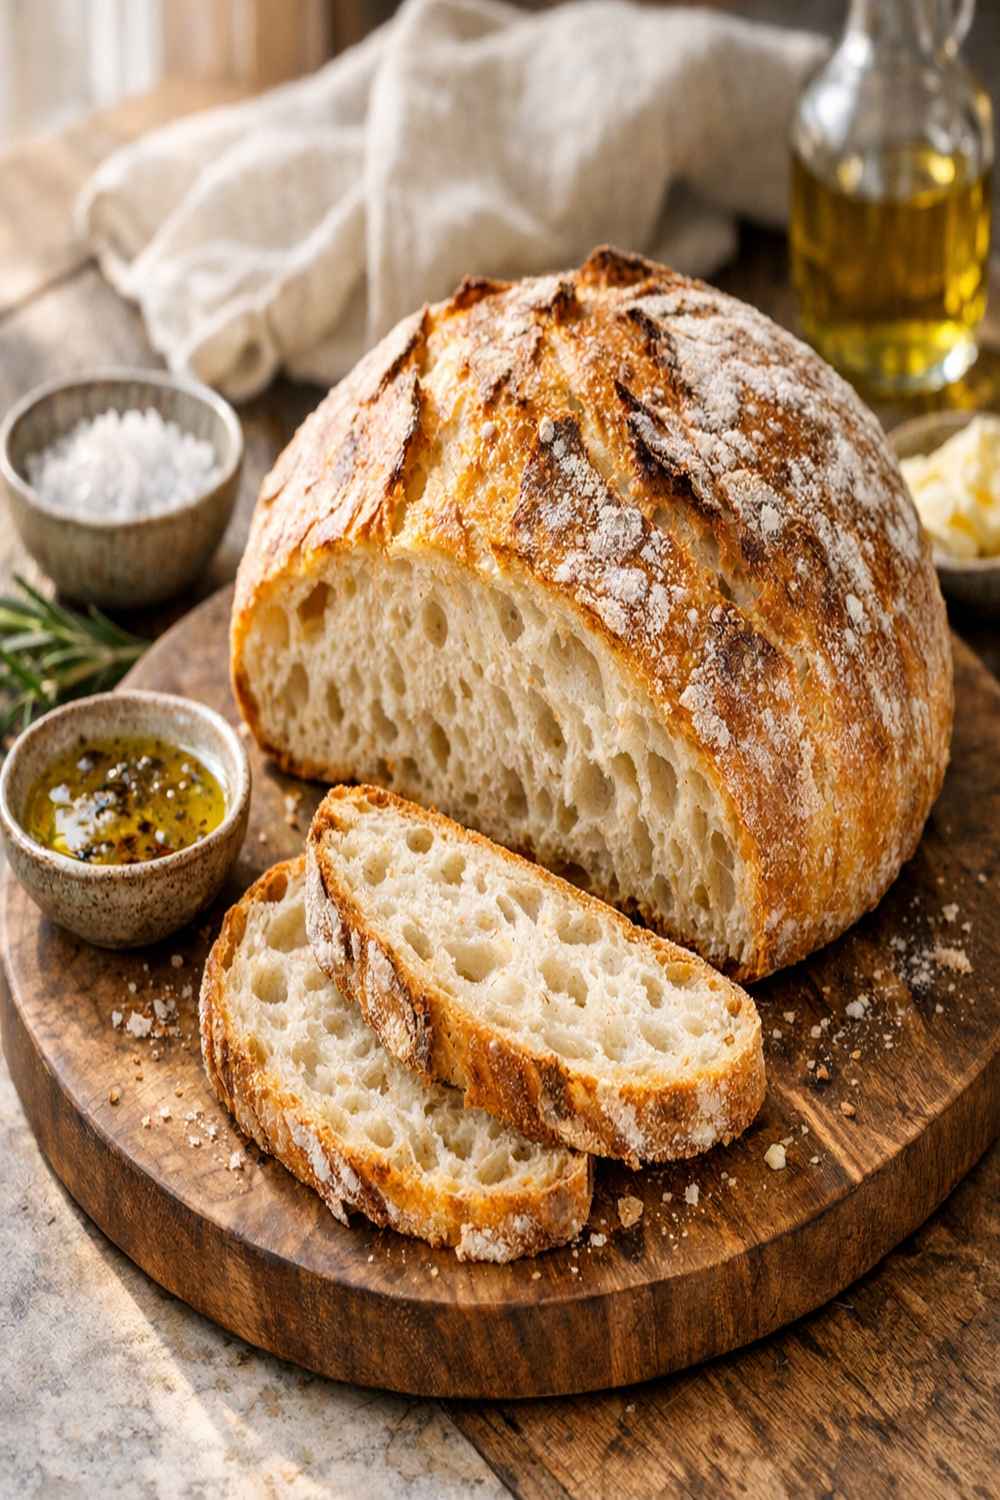
There’s nothing quite like slicing into a warm loaf of crusty bread fresh from the oven. Whether you’re pairing it with BBQ chicken baked in the oven for dinner or serving it alongside a hearty bean and quinoa recipe, homemade bread elevates everything on the plate. I used to think crusty artisan bread required serious skill and hours of hands-on time. Then I discovered no-knead bread, and honestly? It changed my baking life.
The Day I Stopped Being Afraid of Bread
I remember standing in my kitchen on a Saturday morning about eight years ago, staring at a recipe that promised crusty, bakery-quality bread with minimal effort. My mom had always made bread from scratch, and I’d watched her knead dough for what felt like forever. I inherited her intimidation about yeast and gluten development, convinced I’d never get it right.
But this recipe? It asked me to literally do nothing but mix ingredients and wait. No kneading. No shaping gymnastics. Just patience and time. I mixed the dough that morning, covered it, and went about my weekend. When I came back hours later to find this wobbly, bubble-filled mass of dough that had transformed into something magical, I was hooked.
That first loaf wasn’t perfect, but it was mine. And it tasted incredible.
What is No-Knead Bread?
No-knead bread is exactly what it sounds like—a method for making crusty, chewy artisan-style bread without any kneading whatsoever. The recipe relies on a long, slow rise instead of aggressive kneading to develop gluten structure. This approach was popularized by baker Mark Bittman and has become a favorite for home cooks everywhere.
The magic happens through time and chemistry. A minimal amount of yeast, combined with a wet dough and extended fermentation, creates the same complex flavors and open crumb structure you’d get from hours of kneading. The wet dough does the work for you. When you finally shape and bake it in a screaming-hot Dutch oven, the steam creates that stunning golden crust you see in fancy bakeries.
What I love most about this method is how forgiving it is. The long rise time means you have flexibility. Need to refrigerate the dough for a few days? Go ahead. Running late? No problem. This bread works with your schedule, not against it.
Why You’ll Love This No-Knead Bread Recipe
- Genuinely minimal hands-on time – You’ll spend maybe five minutes actually working with dough. The rest is just waiting while flavor develops naturally.
- No special equipment required – A bowl, a wooden spoon, and a Dutch oven. That’s it. Most of us have all three in our kitchen right now.
- Impressive results that feel like magic – When friends taste this bread, they think you’ve been secretly attending culinary school. You haven’t. You’ve just been waiting around.
- Flexibility built in – Want to bake it today? Tomorrow? Three days from now? The refrigerator is your friend. This recipe adapts to real life.
- Economics that make sense – A loaf costs you pennies in ingredients. Store-bought crusty bread can run five to seven dollars. Make this twice and you’ve already saved money.
- Nutritional advantage of long fermentation – The extended rise time allows beneficial bacteria and enzymes to break down gluten and phytic acid, making this bread easier to digest than quick-rise varieties.
- A foolproof gateway into bread baking – If you’ve been intimidated by yeast breads, this is your entry point. Seriously. I’ve taught this recipe to complete bread-baking novices, and they’ve all succeeded.
The Ingredients
Here’s what you need to create a beautiful, crusty loaf. Don’t be intimidated by the simplicity—sometimes the best things are made from the fewest ingredients. This makes one gorgeous loaf.
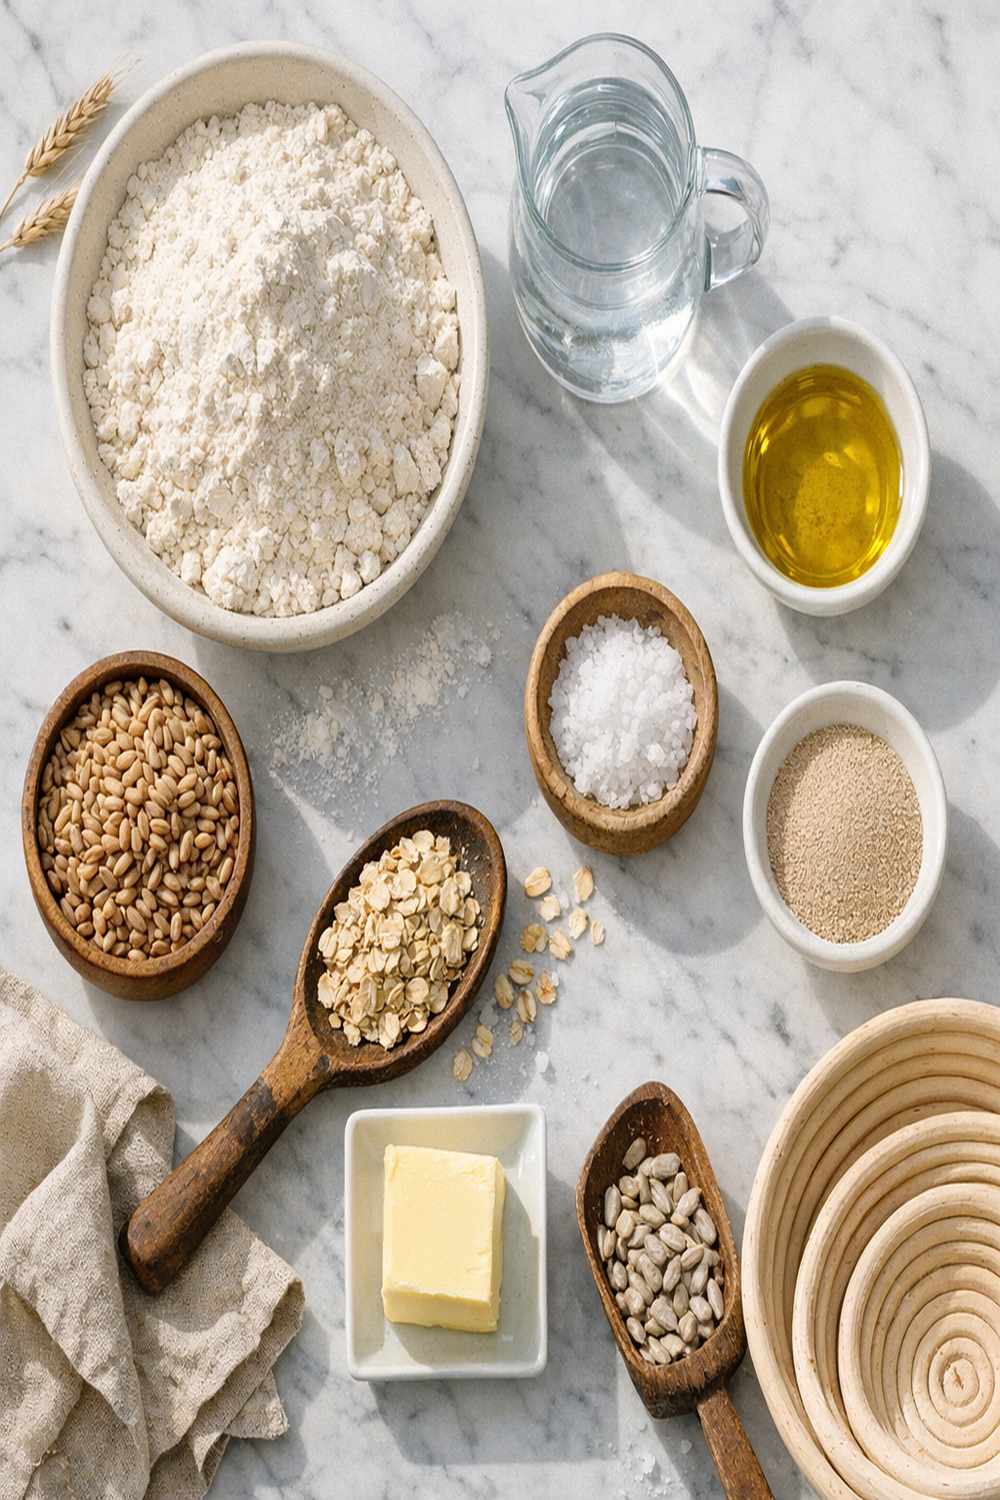
A few notes on what you’re buying: bread flour gives you slightly more gluten, which means a chewier crumb, but all-purpose flour works beautifully too. The choice is yours. Water temperature matters more than you’d think—too hot and you’ll kill the yeast. Lukewarm is perfect. Salt type affects measurements, so pay attention there. And yes, you actually do need that flour for dusting. It keeps things from sticking and becomes part of your crust.
- 1½ teaspoons kosher salt or sea salt (halve this if using table salt, which is denser)
- 1½ tablespoons flour (for dusting your work surface and dough)
- ½ teaspoon sugar (optional but helps activate yeast, especially if using older yeast)
- 3 cups bread flour or all-purpose flour (spooned and leveled, never packed)
- Extra olive oil (about 1 teaspoon, optional for a more tender crumb)
- 2 teaspoons instant or rapid-rise yeast (or use 2½ teaspoons active dry yeast)
- 1½ cups very warm tap water (up to 130°F, not boiling)
How to Make No-Knead Bread?
I’m going to walk you through this step by step. The process is genuinely simple, but paying attention to a few details makes the difference between okay bread and bread that makes people ask for your recipe.
Step 1: Mix Your Dough Together
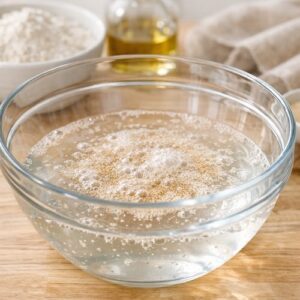
Pour your water into a large mixing bowl. Add the yeast and let it sit for about a minute—this gives the yeast a chance to hydrate and start waking up. In the same bowl, combine your flour, salt, and sugar if you’re using it. I like to whisk these dry ingredients together first, right in the bowl, which helps distribute the yeast and salt evenly.
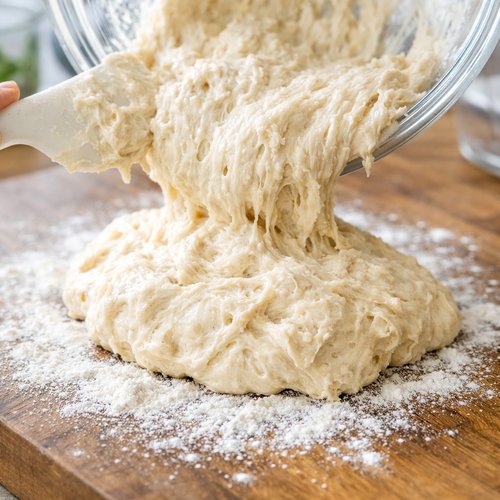
Now here’s where things get easy. Use the handle of a wooden spoon (or a sturdy rubber spatula) to mix everything together. You’re not kneading. You’re just combining. Stir until every bit of flour is incorporated into the water. The dough will look wet, shaggy, and honestly kind of unappetizing. It should be wetter than normal bread dough but not runny like cake batter. If it looks too dry, add water one tablespoon at a time. If somehow it’s too wet, sprinkle in a bit more flour.
Once everything is combined, you’re done with this step. Seriously. That took maybe three minutes, and your dough is officially ready to rise.

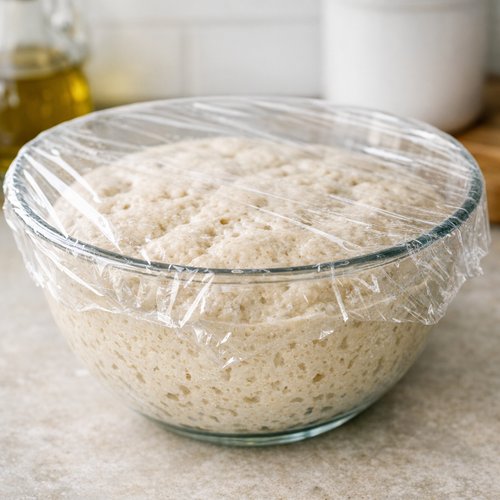
Step 2: The First Rise—Let Time Do the Work
Cover your bowl with plastic wrap, a kitchen towel, or even a plate. Leave it on the counter at room temperature. Now you wait. This is the hard part for us impatient humans.
Over the next 2 to 3 hours, something beautiful happens. The dough will more than double in volume. It’ll look wobbly, jiggly, almost gelatinous—like dough-flavored Jello. The top will be bubbly with gas bubbles. Some of those bubbles might pop, creating little craters on the surface. This is all exactly what you want.
If you’re in a cool kitchen and nothing seems to be happening after an hour, move the bowl somewhere warmer. A sunny windowsill works. An oven with the light on works. Even the top of your refrigerator creates a slightly warmer microclimate. You’re looking for rise, not heat.
This waiting period is when your bread develops flavor. The long fermentation creates complex tastes you simply can’t get from a quick rise.
Step 3: Choose Your Path—Bake Today or Refrigerate for Later
This is where this recipe becomes a game-changer for real life. You have two options, and both work beautifully.
Option A: Bake immediately – Skip to Step 5 and keep going. Your bread will be ready in about an hour.
Option B: Refrigerate for flavor development – Cover your risen dough and place the whole bowl in the refrigerator. You can keep it there for up to 3 days. The cold slows fermentation way down, allowing deeper flavor development and actually making it easier to work with when you bake. This is my preferred method on weekends when I want fresh bread on a specific day. Thursday morning I mix it, and Sunday morning I bake it.
If you’re refrigerating, you absolutely must take it out and let it come to room temperature before baking. Leave the covered bowl on the counter for 45 to 60 minutes while your oven preheats. Cold dough won’t rise properly in the oven.
Step 4: Preheat Your Oven and Dutch Oven
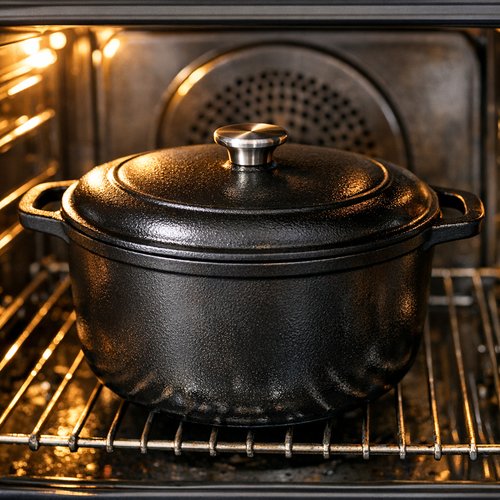
This step happens while your dough is warming up if you refrigerated it, or right before shaping if you didn’t. Place your Dutch oven (with the lid on) in your oven. Set your oven to 450°F (230°C, or 220°C if you have a fan-forced oven). Let everything preheat together for at least 30 minutes. You want that pot absolutely screaming hot. This heat creates the steam that gives you that gorgeous crust.
If you don’t have a Dutch oven, don’t stress. You can use a covered baking vessel or even place a rimmed baking sheet upside down over your shaped dough on a regular baking sheet. It’s not quite as good at creating steam, but it still works.
Step 5: Shape Your Dough
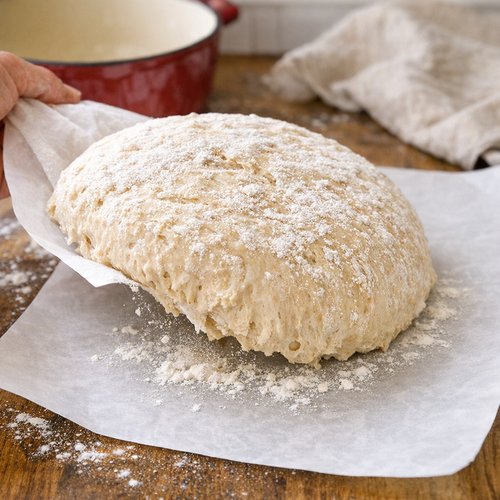
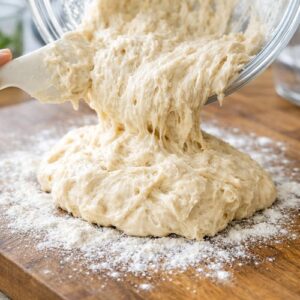
Sprinkle your work surface (counter, cutting board, large plate) with about one tablespoon of flour. Scrape your dough out of the bowl. It’ll be sticky and loose, which is normal. Sprinkle another half tablespoon of flour on top.
Using a dough scraper, cake server, large knife, or even a sturdy spatula, fold the sides of the dough inward. Do this about six times, turning as you go. You’re not trying to make it perfect. You’re basically deflating some of the big bubbles and gathering it into a vaguely round shape. Don’t overthink this. Lopsided is actually better—those irregular shapes create more crunchy bits when baked.
Here’s a pro tip: The seam side will be rough and ugly, and the smooth side will be beautiful. You want the smooth side facing up when you bake.
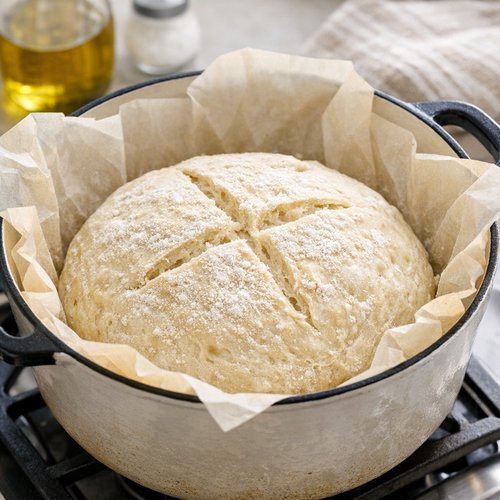
Step 6: Transfer to Your Dutch Oven
Cut or tear off a piece of parchment paper (about 12 x 16 inches works great). Slide it next to your dough, then flip the dough upside down onto the paper. The seam side is now down, the smooth side is up. Perfect. Nudge the dough toward the center of the paper and reshape it gently into a round shape if needed.
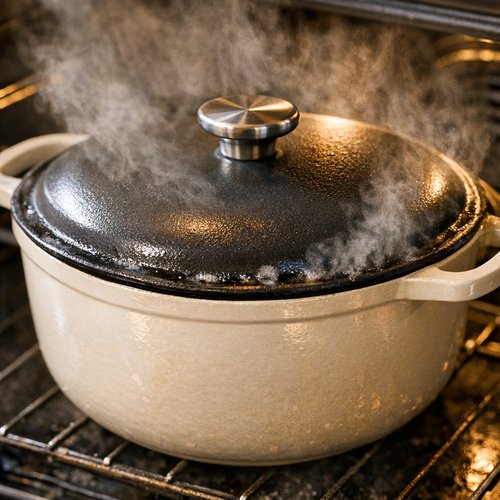
Using the parchment paper as handles, carefully place your dough into the preheated Dutch oven. The pot will be extremely hot—seriously, be careful. The dough will sizzle slightly. That’s good. Put the lid on the pot.
Step 7: Bake Covered, Then Uncovered
Bake with the lid on for 30 minutes. During this time, steam builds inside the pot, which is creating that beautiful, crispy crust. Don’t peek. I know you want to, but resist.
After 30 minutes, carefully remove the lid (steam will escape—watch your face). Bake uncovered for 12 to 15 minutes more, until your bread is deep golden brown and the crust is visibly crispy. The bottom should be dark and sound hollow when you tap it.
Remove the bread from the oven and carefully transfer it to a cooling rack using the parchment paper. Let it cool for at least 10 minutes before slicing. I know this is torture. The bread is still cooking internally during cooling, so please be patient.
Common Mistakes to Avoid
- Using water that’s too hot – This kills your yeast before it even has a chance to work. If you can hold your hand in the water for a full ten seconds, it’s the right temperature. If you can’t, let it cool.
- Skipping the preheating step for your Dutch oven – That 30-minute preheat is non-negotiable. A lukewarm pot won’t create steam. You need screaming hot. This is where the magic happens.
- Opening the lid too early to peek – I get it. You’re excited. But opening the lid during that first 30 minutes releases the steam you’ve built up. Keep it closed.
- Slicing the bread too soon – Fresh bread is heavenly, but if you slice it while it’s too hot, the inside will be gummy. That 10-minute rest is when the crumb sets properly.
- Using old yeast or yeast stored in a hot kitchen – Yeast has an expiration date. If it’s past that, it won’t rise properly. Store it in the refrigerator or freezer if you can, especially in warm climates.
Tips and Tricks From My Kitchen
- Make it your own with mix-ins – After the first rise, you can fold in herbs, seeds, or even olives. Rosemary and sea salt is my favorite combination. Add these gently so you don’t deflate all the bubbles you’ve worked to create.
- Score your loaf for stunning presentation – Just before putting your dough in the pot, use a sharp knife or baker’s lame to score the top with a crosshatch or simple line. This helps control where the bread expands and creates those gorgeous cuts you see in bakery bread.
- The cold rise is your secret weapon – I mentioned this before, but it’s worth saying again. Refrigerating your dough for a day or two before baking creates deeper, more complex flavor. The texture actually improves too.
- Toast it the next day – Bread naturally dries out as it sits. By the next morning, it’s perfect for toasting. Slice it thick and watch it transform into something even better than fresh.
- Experiment with flours – Once you’ve nailed this recipe with all-purpose flour, try swapping 10-15% for whole wheat flour. Adds nutty flavor and more fiber without drastically changing the results.
- Use a thermometer if you have one – The internal temperature of fully baked bread should reach 205-210°F. If you’re not sure if it’s done, this takes the guesswork out.
Expert’s Nutritional Tip: The Power of Long Fermentation
From a nutritional standpoint, I’m genuinely excited about no-knead bread. That long fermentation time does something special to wheat that quick-rise breads don’t get. The bacteria and enzymes naturally present in flour break down phytic acid, which is an anti-nutrient that binds minerals. This means your body can actually absorb the iron, zinc, and magnesium in the bread more effectively.
The extended fermentation also begins breaking down gluten proteins, making the bread easier on the digestive system. If you’ve had trouble with regular bread, a slow-fermented loaf like this is often much gentler. The flavor complexity that develops is literally a byproduct of beneficial microorganisms doing their thing. You’re getting better nutrition and better taste from the same simple ingredients.
Make-Ahead Guide: Planning Your Bread Schedule
One of my favorite things about this recipe is how it fits into real life. Here’s how I plan my week:
The Day-Before Method: Tuesday evening, I mix my dough. Wednesday morning, I refrigerate it. Wednesday evening, I take it out to warm up, bake it, and have fresh bread for Thursday dinner and Friday breakfast.
The Weekend Method: Friday evening, I make the dough. It rises overnight in the fridge. Saturday morning, I bake it fresh. Sunday evening, I have leftover bread for toast.
The Batch Method: Make multiple batches. While one is in the oven, mix the next. I’ll often have two or three batches going at different stages. When you only need flour, yeast, water, and salt, why not?
The dough keeps in the refrigerator for up to 3 days. Baked bread stays fresh in a bread box or sealed container for 3 to 4 days. After that, it’s perfect for toasting or making breadcrumbs. You can also freeze unbaked dough for up to one month—just thaw it in the refrigerator overnight before baking.
Can I Store No-Knead Bread?
Yes, and it stores beautifully. A freshly baked loaf keeps at room temperature in a bread box or sealed container for 3 to 4 days. Don’t refrigerate it—cold makes bread stale faster than room temperature does. That’s counterintuitive, I know, but it’s true.
For longer storage, freeze your baked bread. Slice it first if you like, wrap it tightly in plastic wrap and then foil, and it’ll keep for up to three months. Thaw at room temperature whenever you want fresh bread. Or pop frozen slices directly into the toaster.
You can also freeze unbaked dough. After the first rise, shape it, wrap it well, and freeze for up to one month. Thaw it in the refrigerator overnight, let it come to room temperature for 45-60 minutes, then bake as directed.
Nutrition Information
Based on USDA nutrition data, one slice of this bread (calculated as a 16-slice loaf) contains approximately 150 calories, with 5 grams of protein, 28 grams of carbohydrates, 1 gram of fat, and 1.5 grams of fiber. It’s an excellent source of B vitamins, especially thiamine and niacin, and provides meaningful amounts of iron and magnesium.
The sodium content is 280 milligrams per slice, which is reasonable for bread. Keep in mind that the fermentation process makes minerals more bioavailable—your body actually uses more of what’s in the flour compared to non-fermented bread.
There’s no added sugar, just what naturally occurs in the wheat. The fiber comes entirely from the grain, making this more nutritious than many commercial white breads. If you want to boost fiber further, substitute up to 15% of the all-purpose flour with whole wheat flour.
What Can I Serve With No-Knead Bread?
Honestly? This bread goes with almost everything. But here are my favorite combinations from my kitchen:
- Dipped in good olive oil with herbs – The simplest preparation is often the best. A quality olive oil, fresh cracked pepper, and maybe some dried oregano is all you need.
- Alongside soup or stew – This bread was made for tearing into chunks and dunking. The crust gives you something to grip, and the tender crumb soaks up every bit of liquid.
- As the foundation for breakfast toast – Slice it thick, toast it until crispy, and top with butter and jam, or avocado and egg. This is how I eat my leftover slices the next day.
- With cheese and charcuterie – The complex flavor of this bread actually stands up to quality ingredients. Serve it with aged cheddar, prosciutto, and cornichons for an elegant snack.
- With dinner mains – Pair it with roasted chicken, grilled fish, or hearty proteins. It’s especially wonderful with bass recipe preparations or bean rice cheese burrito dinners. The contrast between the crusty exterior and tender crumb is just right alongside rich foods.
- For making sandwiches the next day – Yesterday’s bread makes today’s best sandwich. The texture is perfect—sturdy enough to hold up to filling but still tender.
Seasonal Variations
Spring and Summer: Add fresh herbs like basil, thyme, or dill during the shaping step. Or make a version with sun-dried tomatoes and olives. In warm weather, your first rise might only take 1.5 to 2 hours instead of 2 to 3, so watch for doubling rather than relying on time alone.
Fall: Fold in pumpkin seeds and a teaspoon of pumpkin pie spice after the first rise. The spices complement the nutty flavors developed during fermentation beautifully.
Winter: Add coarsely chopped walnuts or pecans. Sprinkle the outside with coarse sea salt before baking for extra texture and visual appeal. The holidays are the perfect time to make multiple loaves and gift them to friends.
Year-round, you can experiment with different types of flour—spelt, einkorn, or rye—as long as you start by replacing just 10-15% of the all-purpose flour so the recipe still works properly.
Substitutes
- Active dry yeast instead of instant yeast – Use 2½ teaspoons instead of 2 teaspoons. Active dry yeast is slightly less concentrated, so you need a bit more. The rise might take an extra 15-30 minutes.
- Whole wheat flour – You can substitute up to 15% of the all-purpose flour with whole wheat flour for added nutrition and a nuttier flavor. More than that and your dough becomes too dense.
- Kosher salt in place of sea salt – They’re essentially interchangeable in this recipe. If you only have table salt, use ¾ teaspoon instead of 1½ teaspoons because table salt is denser and saltier by volume.
- All-purpose flour instead of bread flour – This is actually my go-to. Bread flour creates a slightly chewier crumb, but all-purpose works beautifully and most of us have it on hand anyway.
- A baking stone instead of a Dutch oven – Preheat a baking stone in your oven and carefully slide the dough onto it. You won’t get quite as much crust development, but it still works. You’ll need to mist the oven with water a few times during baking to create steam.
Bread Recipe No Knead
Ingredients
Method
- Pour your water into a large mixing bowl. Add the yeast and let it sit for about a minute—this gives the yeast a chance to hydrate and start waking up. In the same bowl, combine your flour, salt, and sugar if you're using it. I like to whisk these dry ingredients together first, right in the bowl, which helps distribute the yeast and salt evenly. Now here's where things get easy. Use the handle of a wooden spoon (or a sturdy rubber spatula) to mix everything together. You're not kneading. You're just combining. Stir until every bit of flour is incorporated into the water. The dough will look wet, shaggy, and honestly kind of unappetizing. It should be wetter than normal bread dough but not runny like cake batter. If it looks too dry, add water one tablespoon at a time. If somehow it's too wet, sprinkle in a bit more flour. Once everything is combined, you're done with this step. Seriously. That took maybe three minutes, and your dough is officially ready to rise.
- Cover your bowl with plastic wrap, a kitchen towel, or even a plate. Leave it on the counter at room temperature. Now you wait. This is the hard part for us impatient humans. Over the next 2 to 3 hours, something beautiful happens. The dough will more than double in volume. It'll look wobbly, jiggly, almost gelatinous—like dough-flavored Jello. The top will be bubbly with gas bubbles. Some of those bubbles might pop, creating little craters on the surface. This is all exactly what you want. If you're in a cool kitchen and nothing seems to be happening after an hour, move the bowl somewhere warmer. A sunny windowsill works. An oven with the light on works. Even the top of your refrigerator creates a slightly warmer microclimate. You're looking for rise, not heat. This waiting period is when your bread develops flavor. The long fermentation creates complex tastes you simply can't get from a quick rise.

- This is where this recipe becomes a game-changer for real life. You have two options, and both work beautifully. Option A: Bake immediately - Skip to Step 5 and keep going. Your bread will be ready in about an hour. Option B: Refrigerate for flavor development - Cover your risen dough and place the whole bowl in the refrigerator. You can keep it there for up to 3 days. The cold slows fermentation way down, allowing deeper flavor development and actually making it easier to work with when you bake. This is my preferred method on weekends when I want fresh bread on a specific day. Thursday morning I mix it, and Sunday morning I bake it. If you're refrigerating, you absolutely must take it out and let it come to room temperature before baking. Leave the covered bowl on the counter for 45 to 60 minutes while your oven preheats. Cold dough won't rise properly in the oven.

- This step happens while your dough is warming up if you refrigerated it, or right before shaping if you didn't. Place your Dutch oven (with the lid on) in your oven. Set your oven to 450°F (230°C, or 220°C if you have a fan-forced oven). Let everything preheat together for at least 30 minutes. You want that pot absolutely screaming hot. This heat creates the steam that gives you that gorgeous crust. If you don't have a Dutch oven, don't stress. You can use a covered baking vessel or even place a rimmed baking sheet upside down over your shaped dough on a regular baking sheet. It's not quite as good at creating steam, but it still works.

- Sprinkle your work surface (counter, cutting board, large plate) with about one tablespoon of flour. Scrape your dough out of the bowl. It'll be sticky and loose, which is normal. Sprinkle another half tablespoon of flour on top. Using a dough scraper, cake server, large knife, or even a sturdy spatula, fold the sides of the dough inward. Do this about six times, turning as you go. You're not trying to make it perfect. You're basically deflating some of the big bubbles and gathering it into a vaguely round shape. Don't overthink this. Lopsided is actually better—those irregular shapes create more crunchy bits when baked. Here's a pro tip: The seam side will be rough and ugly, and the smooth side will be beautiful. You want the smooth side facing up when you bake.
- Cut or tear off a piece of parchment paper (about 12 x 16 inches works great). Slide it next to your dough, then flip the dough upside down onto the paper. The seam side is now down, the smooth side is up. Perfect. Nudge the dough toward the center of the paper and reshape it gently into a round shape if needed. Using the parchment paper as handles, carefully place your dough into the preheated Dutch oven. The pot will be extremely hot—seriously, be careful. The dough will sizzle slightly. That's good. Put the lid on the pot.

- Bake with the lid on for 30 minutes. During this time, steam builds inside the pot, which is creating that beautiful, crispy crust. Don't peek. I know you want to, but resist. After 30 minutes, carefully remove the lid (steam will escape—watch your face). Bake uncovered for 12 to 15 minutes more, until your bread is deep golden brown and the crust is visibly crispy. The bottom should be dark and sound hollow when you tap it. Remove the bread from the oven and carefully transfer it to a cooling rack using the parchment paper. Let it cool for at least 10 minutes before slicing. I know this is torture. The bread is still cooking internally during cooling, so please be patient.

Nutrition
Notes
Tried this recipe?
Let us know how it was!FAQs
Can I Make This Dough in a Stand Mixer?
Absolutely. Use the paddle attachment and mix on low speed for about 2 minutes until everything is just combined. The dough should be wet and shaggy, not smooth. Don’t overmix. Actually, I often stick with hand mixing for this recipe because it’s so quick and uses fewer dishes. But if you have a stand mixer going for something else, go ahead and use it.
What If My Dough Isn’t Rising?
First, check your yeast expiration date. Old yeast won’t rise. Second, make sure your kitchen is warm enough. Dough rises much slower in cold kitchens. Try moving it to a warmer spot. If you’re still not seeing rise after two hours, your yeast might be dead. Start over with fresh yeast. On the bright side, this usually only happens once, and then you know what to look for.
Can I Use Instant Yeast From a Jar Instead of Individual Packets?
Yes, and I actually prefer it because it’s more economical. Two teaspoons of instant yeast from a jar works the same as one packet. Store the jar in the refrigerator or freezer after opening to keep the yeast alive longer.
Is the Dough Supposed to Smell Like Alcohol or Beer?
Yes, actually. During long fermentation, the yeast produces a small amount of alcohol as a byproduct. This smell dissipates during baking and actually contributes to the complex flavor. If the smell is overwhelming, your dough might be over-proofed, but it’ll usually still bake into fine bread. Next time, reduce the rise time by 30 minutes.
How Do I Know When the Bread Is Actually Done Baking?
Look for a deep golden brown color—not light brown, but really golden. Tap the bottom of the loaf. It should sound hollow. If you have an instant-read thermometer, the internal temperature should be 205-210°F. If you’re unsure, it’s better to bake a few minutes longer than to underbake. Underbaked bread will have a gummy crumb.
More Recipes You’ll Love
- this simple cake – Perfect for enjoying alongside fresh slices of this bread on a lazy weekend morning
- this simple cake – While bread and cake are different, both rely on good ingredients and proper technique
- Bean and Quinoa Recipe – A hearty grain bowl that pairs beautifully with crusty bread for scooping
- BBQ Chicken Baked in Oven Recipe – Serve this bread alongside to soak up every bit of sauce
I genuinely believe this no-knead bread recipe has changed how I think about home cooking. It proved to me that the best results don’t come from complexity or stress—they come from understanding a few basic principles and then getting out of the way and letting time do the work. This bread taught me patience. It taught me that my kitchen doesn’t have to be fancy or my technique perfect for me to create something genuinely delicious that impresses the people I love.
Every time I slice into a fresh loaf, I think about that Saturday morning eight years ago when I was terrified of yeast. Now I make this bread regularly, sometimes without even thinking about it. And every single time, it’s beautiful.
You’re going to make this bread, and you’re going to love it. And then you’re going to make it again. Happy cooking!