There’s something magical about pulling a warm, crusty loaf from your oven. The kind of bread that shatters when you bite into it, with that perfect chewy interior? Yeah, I’m talking about that. This Dutch oven bread is your ticket to homemade perfection, and honestly, it’s easier than you’d think. Serve it alongside a hearty bean and quinoa recipe for a complete meal, or pair it with BBQ chicken baked in oven for a weekend dinner that’ll impress everyone at your table.
The Day I Discovered Dutch Oven Magic
I still remember the first time I pulled a loaf of Dutch oven bread out of my oven. My kitchen smelled like a French bakery, and I genuinely couldn’t believe I’d made it myself. My neighbor actually knocked on my door thinking I’d bought it from somewhere—I wish I was joking. That moment changed how I thought about baking. I’d spent years thinking crusty, bakery-style bread required fancy equipment or some secret technique I’d never learn. Turns out, all I needed was patience, a Dutch oven, and about four basic ingredients.
What is Bread In A Dutch Oven Recipe?
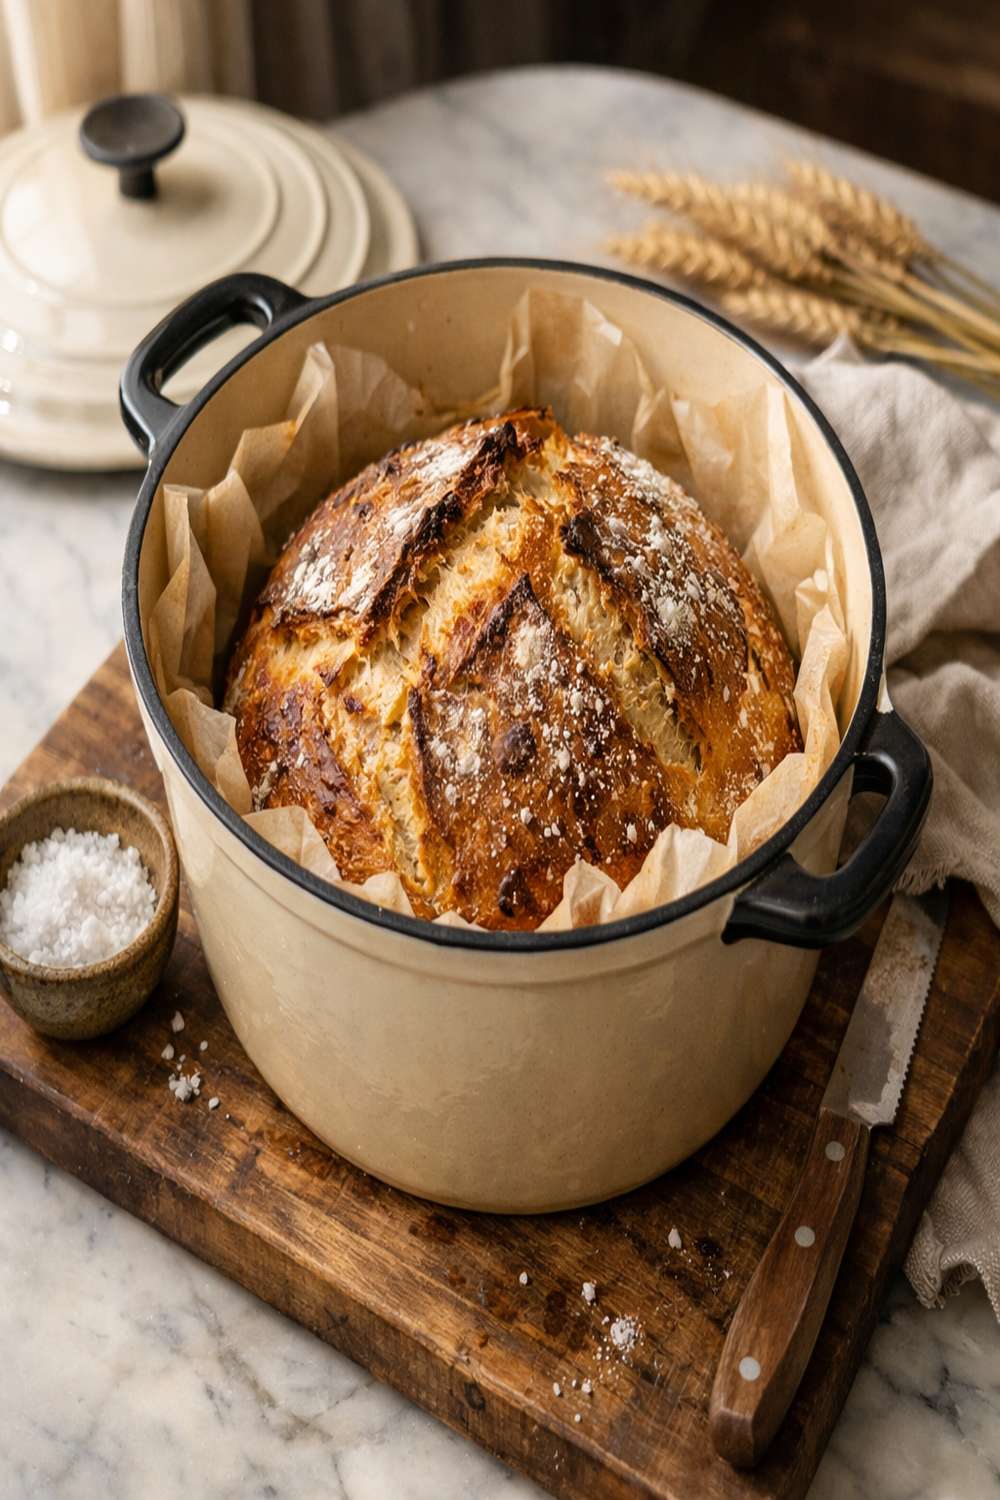
Dutch oven bread is a no-fuss approach to creating a bakery-quality crusty loaf at home. The magic happens because the Dutch oven traps steam during baking—that steam is what creates that gorgeous golden crust and chewy interior you’re after. This isn’t some complicated artisan technique either. It’s a straightforward method that uses a simple wet dough, minimal hands-on time, and heat to do the heavy lifting.
The beauty of this recipe is its history. It comes from the rustic bread-making tradition where bakers would create a steamy environment to get professional results. Modern home cooks discovered that a Dutch oven—that workhorse pot you might already own—does exactly what a professional steam injection system does. The result? You get that signature crackly crust and open, airy crumb structure without needing special equipment or extensive baking experience.
Why You’ll Love This Bread In A Dutch Oven Recipe
- Minimal ingredients and fuss – Five simple items and you’re done. No special equipment beyond what most kitchens already have. No kneading required, which is a game-changer if you’ve got time constraints or joint pain.
- Hands-off rising time – Once you mix it, you’re mostly waiting. The recipe does the work while you handle other tasks. This is perfect if you’re meal planning or preparing other components of your dinner.
- Professional-looking results – Seriously, this bread looks bakery-quality. Your family will be impressed, and you’ll feel like a legit baker.
- Flexible timing – You can bake it fresh, or refrigerate the dough for later. Great for meal prep or when you want fresh bread on your schedule, not on a predetermined timeline.
- Budget-friendly – You’re spending maybe a dollar on ingredients. That’s pennies compared to a bakery loaf, and yours is fresher and tastes better.
- Makes great leftovers – This bread keeps beautifully for a few days. Toast it, make breadcrumbs, or use it for breakfast the next morning.
The Ingredients
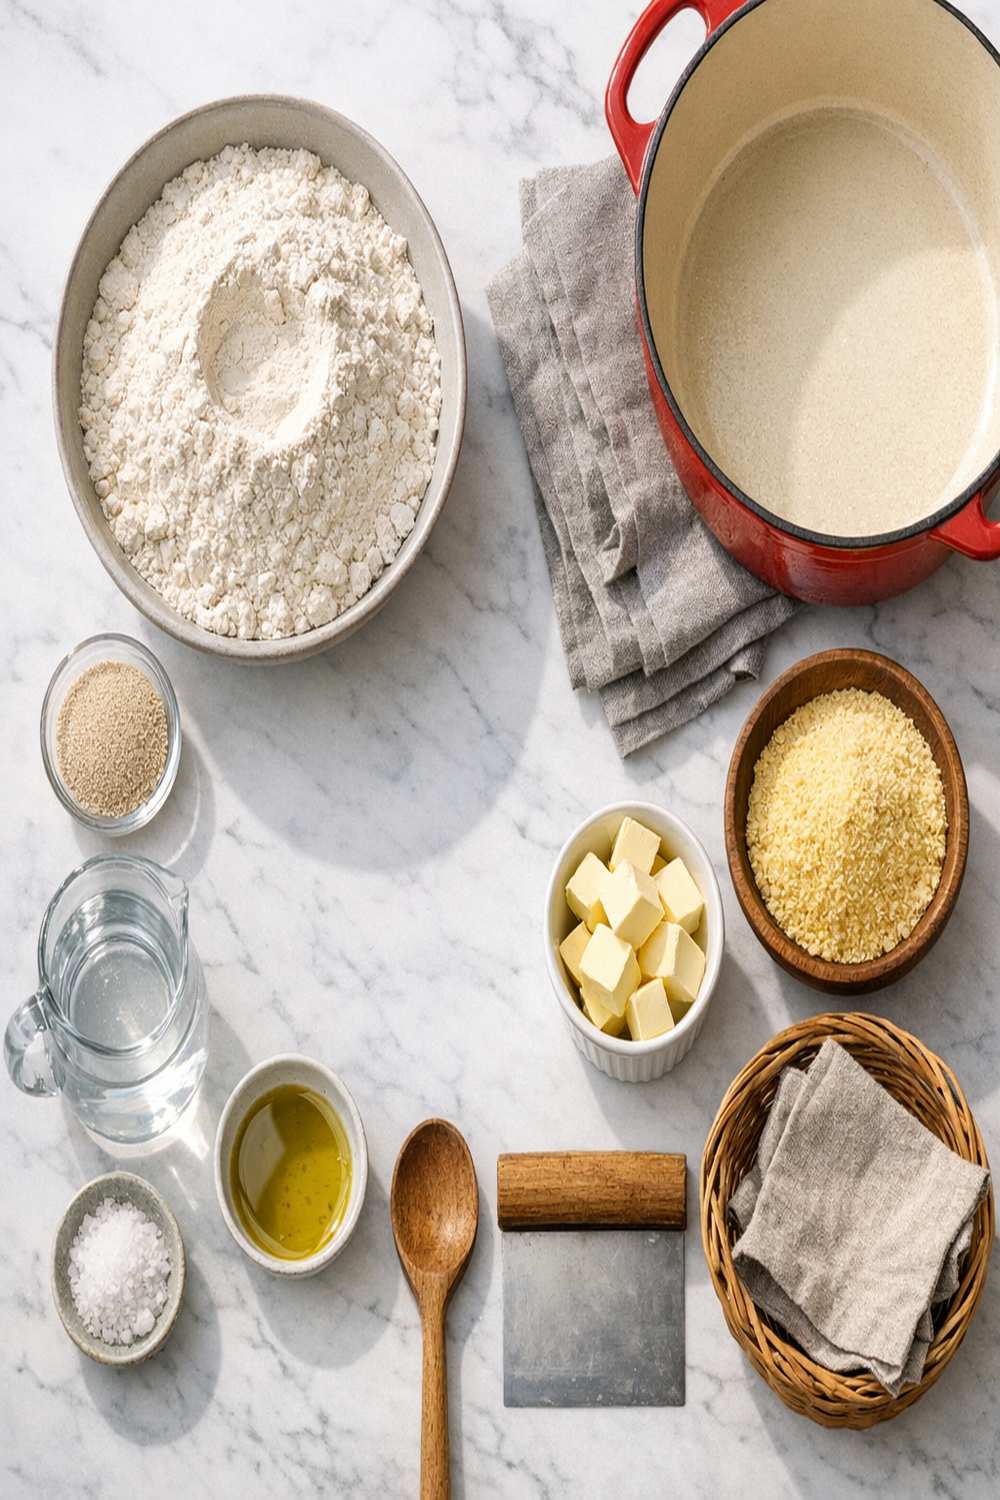
Here’s what you need for one beautiful loaf. Everything is probably already in your pantry, which means you can start this recipe literally right now.
- 1½ cups warm water (around 100 degrees Fahrenheit – this is the sweet spot for activating yeast)
- 1 packet instant dry yeast (or 2.25 teaspoons – any type works)
- 1½ teaspoons fine sea salt (not iodized table salt – it affects fermentation)
- 1 tablespoon honey (optional but helps with browning and adds subtle depth)
- ¼ teaspoon ground black pepper (a tiny pinch that nobody will detect but makes the bread more complex)
- 3¼ cups all-purpose flour (spooned and leveled, not packed down)
Yield: Makes 1 beautiful crusty loaf (about 12-14 slices)
How to Make Bread In A Dutch Oven Recipe?
The process is straightforward and broken into manageable steps. You’ll have your dough mixed in about five minutes, then it’s all about patience and timing. Let me walk you through it.
Step 1: Combine Your Wet Base
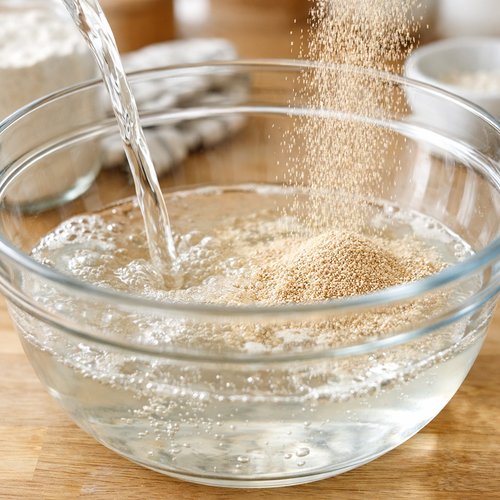
Grab a large bowl or container—I use a clear container so I can see the rise happening. Pour in your warm water, add the yeast packet, and sprinkle in your salt. Now grab a whisk and stir this together for about 30 seconds until the yeast and salt are mostly dissolved. You don’t need them perfectly dissolved, just mostly incorporated. This mixture should feel warm to your touch but not hot—if it’s too hot, you’ll kill the yeast. If it’s too cool, the rising takes longer.
Step 2: Bring the Flour In
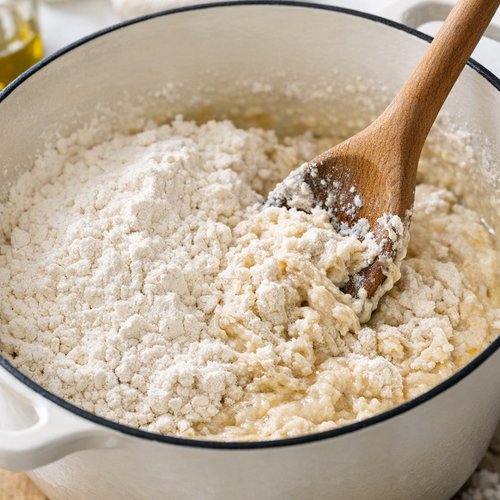
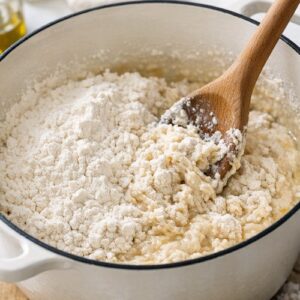
Add all your flour at once directly into the wet mixture. Grab a sturdy spoon or wooden spoon and stir everything together until all the dry flour is incorporated and you have a sticky, shaggy dough. This will look messy. That’s correct. You’re not going for smooth here—you just want everything uniformly wet. Use a silicone spatula to scrape any bits clinging to your spoon.
Here’s a pro tip: if your dough looks too wet and soup-like, add 1-2 tablespoons more flour and stir it in. If it looks too dry and crumbly, add water by the tablespoon until it comes together into a wet dough. You want something that looks sticky enough to be slightly challenging to handle, but not so wet that it’s basically batter.
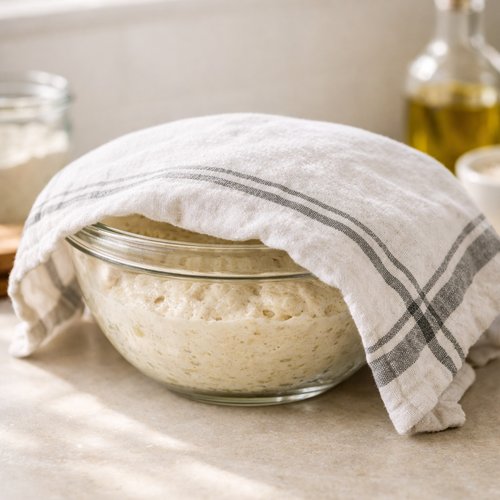
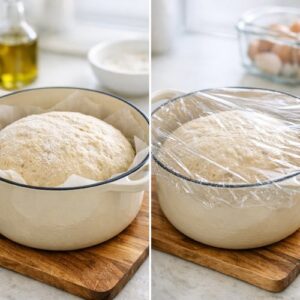
Step 3: Let It Rise (The Waiting Game)
Cover your bowl with a kitchen towel or loosely place a lid on top. Find a warm spot in your home—your kitchen counter works fine, but if your house is chilly, here’s my favorite trick: preheat your oven for five minutes, then turn it off completely. Place your dough bowl inside the turned-off oven and close the door. That trapped warmth creates an ideal rising environment.
Now you wait 2-3 hours until the dough roughly doubles in volume. It should look puffy and active. You might even see some bubbles on the surface. If it’s cold outside and your house is chilly, it might take closer to three hours. On a warm day, it might be done in two hours. This is flexible, so don’t stress if it takes a bit longer.
Step 4: Decide Your Timeline (Bake Now or Chill Later)
After your rise, you’ve got options. You can bake it immediately, or you can cover it and refrigerate it for up to 24 hours. I’ll explain storage details later, but this flexibility is one of my favorite parts of this recipe.
Step 5: Get Your Dutch Oven Screaming Hot
This step is crucial, so pay attention. Place your Dutch oven (with the lid on) into your oven and preheat to 450 degrees Fahrenheit. Once your oven hits 450, let it keep heating for another 20 full minutes with the Dutch oven inside. You want that pot absolutely hot. This is what creates your steam and that gorgeous crust.

Step 6: Shape and Prep Your Loaf
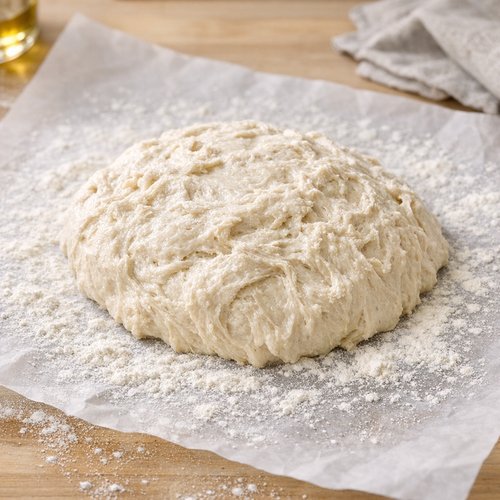
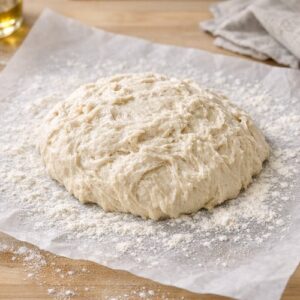
While your Dutch oven is preheating, take a piece of parchment paper and dust it generously with flour. Scrape your dough out of the bowl directly onto the floured parchment. Now here’s the technique: using a silicone spatula, fold the edges of the dough up and over itself a few times, creating an informal round or oval shape—whatever shape fits your Dutch oven.
Once you’ve got it somewhat gathered, use the edges of the parchment paper to flip the whole thing over. Now the floured side is on top and your loaf sits in the center of the parchment. Don’t stress if it’s not perfectly smooth or gorgeous on top. This isn’t a competition.
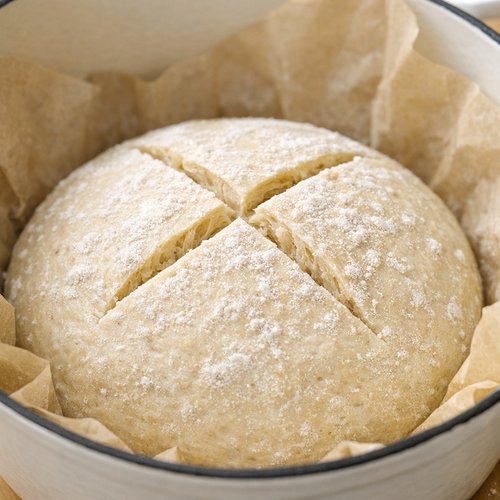
Step 7: Optional But Lovely – Score the Top
Take a very sharp knife or a clean razor blade and make 2-3 shallow slits across the top of your loaf, about ½ inch deep. I usually do a cross pattern, but you can do whatever makes you happy—straight lines, an X, whatever. These scores look beautiful and they give the bread room to expand as it bakes. This is totally optional, but I recommend it because the visual impact is fantastic.
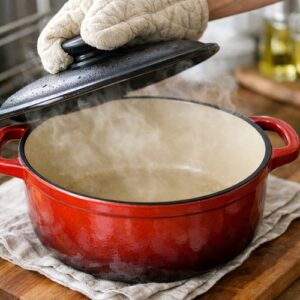
Step 8: Transfer to Your Hot Dutch Oven
This is the only moment that requires a little care. Carefully remove your preheated Dutch oven from the oven (watch out—it’s hot!). Take off the lid and set it aside. Now grab your parchment paper by the sides and gently place your dough into the hot Dutch oven. It should sizzle slightly—that’s the sound of success. The dough will start cooking immediately from the heat of that pot.

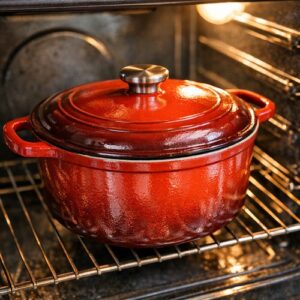
Step 9: Bake Covered
Place the Dutch oven lid back on and put the whole thing back in your 450-degree oven on the center rack. Bake for 35 minutes with the lid on (or 40 minutes if your dough came straight from the fridge). The lid keeps the steam trapped, which is creating that perfect crust.
Step 10: Finish Until Golden
After your covered time, carefully remove the lid (watch for the steam!). You want the bread to bake uncovered for another 5-10 minutes until it turns a gorgeous golden brown color. If you want it darker and crunchier, go closer to 10 minutes. If you prefer a lighter crust, hit it at 5 minutes. The color will deepen slightly as it cools.

Step 11: Cool Before Slicing
Using the parchment paper sides or a pair of tongs, carefully remove your bread from the Dutch oven and place it on a wire rack or cutting board. This is where patience pays off. Wait at least 10 minutes before slicing, though 30 minutes to an hour is ideal if you can manage it. I know it’s tempting to cut into it immediately—the steam rises off it so beautifully—but cutting it too soon will result in a gummy interior. The crumb needs time to set.

Expert’s Nutritional Tip
As a dietitian, I love this bread because it’s made from simple, recognizable ingredients. Unlike commercial breads with their list of preservatives and additives, you control exactly what goes into your loaf. The all-purpose flour provides B vitamins and energy, while the small amount of salt is needed for fermentation and flavor development. The yeast itself contributes B vitamins during fermentation. One slice is satisfying due to the protein and fiber content, so you naturally eat reasonable portions rather than three slices without thinking about it.
The long fermentation period (those 2-3 hours of rising) actually increases the bioavailability of minerals in the flour and makes it easier for your body to digest. This is why fresh bread that’s properly fermented often sits better with people than highly processed commercial bread, even though the ingredients are similar.
Tips and Tricks
- Water temperature matters – Water that’s too cold won’t activate your yeast fast enough. Water that’s too hot will kill it. Around 100 degrees is perfect. If you don’t have a thermometer, it should feel warm but not hot to your wrist.
- Your Dutch oven size impacts shape – I have an oval Dutch oven so I make oval loaves. You have a round one? Make a round loaf. It doesn’t affect the baking, just the final presentation.
- Skip the parchment if you’re comfortable – Once you’ve made this a few times, you can skip the parchment paper and just dust your Dutch oven bottom with flour. It saves a step and works beautifully.
- The scoring is totally optional – It looks fancy and helps the bread expand evenly, but plenty of people skip this step and still get gorgeous bread. Do what feels right to you.
- Store your finished loaf properly – Once completely cool, keep it in a paper bag or bread box on your counter. This keeps the crust crispy while letting the interior stay soft. Avoid plastic bags if you want to maintain that crust.
- Use your oven’s warming drawer – If your oven has a warming drawer, that’s an ideal rising spot. It maintains consistent heat without being too hot.
Make-Ahead Guide
One of my favorite things about this recipe is how flexible it is for meal planning. Here’s my approach: I often make the dough in the morning, let it rise during the day, then refrigerate it overnight. The next morning, I bake it fresh for warm bread with breakfast.
For refrigerator storage: Once your dough has doubled (after the 2-3 hour rise), cover it tightly and refrigerate for up to 24 hours. The dough will continue developing flavor in the cold, which actually makes it taste even better. When you’re ready to bake, remove it from the fridge and proceed with the preheating and baking steps. Add about 5 minutes to your covered baking time since the dough starts cold.
For freezer storage: Shape your dough on parchment, place it on a baking sheet, and freeze for 2-3 hours until solid. Then wrap it tightly in plastic wrap and freeze for up to 3 months. Bake directly from frozen, adding about 10 extra minutes to your covered bake time.
For leftover bread: Wrap your completely cooled loaf in a kitchen towel and store in a bread box or paper bag. It keeps for 3-4 days. Toast it for breakfast, cube it for salads, or use it to make breadcrumbs. It’s also perfect alongside a simple bass recipe for dinner.
Can I Store Bread In A Dutch Oven Recipe?
Yes, absolutely. Once your bread is completely cool, store it in a paper bag or bread box at room temperature for 3-4 days. The paper bag maintains crispness better than plastic, which traps moisture and softens the crust. If you want to keep it longer, wrap it in plastic wrap and freeze for up to 3 months. Toast it straight from the freezer or thaw it at room temperature for a few hours.
Here’s the thing about bread storage: if you want to maintain that gorgeous crispy crust, avoid the fridge. Refrigeration actually speeds up staling. Your counter is your friend. If you know you won’t use it within 4 days, freeze it instead.
Nutrition Information
Based on USDA data, one slice of this bread (approximately 1/14th of the loaf) contains approximately 150 calories, 1.5g fat, 30g carbohydrates, 1.5g fiber, and 5g protein. The bread is a good source of B vitamins and provides manganese, which supports bone health and metabolism.
The nutritional profile is straightforward because the ingredients are straightforward. You’re getting carbohydrates from flour, minimal fat, and protein from both flour and yeast. The fermentation process also creates some beneficial compounds that aid digestion. This is honest, whole-food bread that nourishes you without mystery ingredients.
What Can I Serve With Bread In A Dutch Oven Recipe?
This bread is endlessly versatile. Here’s how I use it throughout the week:
- With soups and stews – A crusty slice is perfect for dipping into hearty vegetable soup or beef stew. The crust gives way to the soft interior, which absorbs broth beautifully.
- With olive oil and balsamic – Warm slices with quality olive oil and aged balsamic vinegar. Simple, elegant, delicious.
- For breakfast toast – This bread makes phenomenal toast. Top it with avocado, a fried egg, or almond butter and berries.
- Alongside cheese and cured meats – Build a charcuterie board with good cheese, prosciutto, olives, and your homemade bread.
- For open-faced sandwiches – The sturdy structure holds up to toppings beautifully. Layer it with smoked salmon, cream cheese, and capers, or tomatoes and basil.
- Beside roasted vegetables – Pair it with your roasted broccoli or Brussels sprouts for a simple, satisfying side.
- With your Sunday dinner – Beside that lemon blueberry coffee cake recipe for a complete meal experience (okay, that’s dessert, but you get the idea).
Substitutes
- Bread flour instead of all-purpose – Bread flour has higher protein content, which creates a chewier crumb and slightly taller loaf. Reduce the water by 2 tablespoons since bread flour absorbs more liquid.
- Whole wheat flour (partial substitution) – Replace up to 25% of your all-purpose flour with whole wheat flour for nuttier flavor and added fiber. You may need to add 1-2 tablespoons more water since whole wheat is thirsty.
- Different salt types – Use kosher salt (increase to 1¾ teaspoons) or sea salt. Avoid iodized table salt as the iodine can interfere with fermentation.
- Different yeast types – Active dry yeast, instant yeast, and rapid-rise yeast all work. Rapid-rise might speed up your rise time by 20-30 minutes.
- Olive oil addition – Add 1 tablespoon of olive oil to the wet mixture for a slightly more tender crumb and richer flavor.
Common Mistakes to Avoid
Mistake 1: Water temperature is off – Too-cold water means slow rising. Too-hot water kills your yeast entirely. If you’re unsure, use room temperature water—it takes longer but definitely works. Use a thermometer if you have one.
Mistake 2: Not preheating the Dutch oven long enough – Some people skip the extra 20 minutes of preheating after the oven reaches temperature. Don’t. That pot needs to be hot enough to create steam immediately. Cold pot equals flat bread.
Mistake 3: Cutting into the bread too soon – I get it. It smells amazing and looks perfect. But cutting into warm bread releases steam and creates a gummy interior. Wait. Your future self will thank you.
Mistake 4: Using the wrong salt – Iodized table salt contains additives that mess with fermentation. Use sea salt or kosher salt instead. It seems like a small thing, but it matters for yeast activation.
Seasonal Variations
Summer baking: Your dough will rise faster in warm weather. You might need only 1.5-2 hours for rising instead of 3. Keep an eye on it. You can also refrigerate your dough to slow the process if you want to control timing better.
Winter baking: Cold kitchens mean slower rising. That preheated-then-turned-off oven trick is your best friend. You might need the full 3 hours. Don’t rush it—slower fermentation actually develops more flavor.
Spring and fall: These seasons are honestly ideal. Your kitchen is likely a comfortable temperature, and you won’t need tricks to manage rising time. Just make the dough and let nature do its thing.
High-altitude adjustments: If you live above 3,000 feet, increase your salt to 1¾ teaspoons and reduce your rising time slightly since yeast works faster at altitude. You might also need to add 1-2 tablespoons more water since water evaporates faster at high altitude.
Bread In A Dutch Oven Recipe
Ingredients
Method
- Grab a large bowl or container—I use a clear container so I can see the rise happening. Pour in your warm water, add the yeast packet, and sprinkle in your salt. Now grab a whisk and stir this together for about 30 seconds until the yeast and salt are mostly dissolved. You don't need them perfectly dissolved, just mostly incorporated. This mixture should feel warm to your touch but not hot—if it's too hot, you'll kill the yeast. If it's too cool, the rising takes longer.

- Add all your flour at once directly into the wet mixture. Grab a sturdy spoon or wooden spoon and stir everything together until all the dry flour is incorporated and you have a sticky, shaggy dough. This will look messy. That's correct. You're not going for smooth here—you just want everything uniformly wet. Use a silicone spatula to scrape any bits clinging to your spoon. Here's a pro tip: if your dough looks too wet and soup-like, add 1-2 tablespoons more flour and stir it in. If it looks too dry and crumbly, add water by the tablespoon until it comes together into a wet dough. You want something that looks sticky enough to be slightly challenging to handle, but not so wet that it's basically batter.
- Cover your bowl with a kitchen towel or loosely place a lid on top. Find a warm spot in your home—your kitchen counter works fine, but if your house is chilly, here's my favorite trick: preheat your oven for five minutes, then turn it off completely. Place your dough bowl inside the turned-off oven and close the door. That trapped warmth creates an ideal rising environment. Now you wait 2-3 hours until the dough roughly doubles in volume. It should look puffy and active. You might even see some bubbles on the surface. If it's cold outside and your house is chilly, it might take closer to three hours. On a warm day, it might be done in two hours. This is flexible, so don't stress if it takes a bit longer.

- After your rise, you've got options. You can bake it immediately, or you can cover it and refrigerate it for up to 24 hours. I'll explain storage details later, but this flexibility is one of my favorite parts of this recipe.
- This step is crucial, so pay attention. Place your Dutch oven (with the lid on) into your oven and preheat to 450 degrees Fahrenheit. Once your oven hits 450, let it keep heating for another 20 full minutes with the Dutch oven inside. You want that pot absolutely hot. This is what creates your steam and that gorgeous crust.
- While your Dutch oven is preheating, take a piece of parchment paper and dust it generously with flour. Scrape your dough out of the bowl directly onto the floured parchment. Now here's the technique: using a silicone spatula, fold the edges of the dough up and over itself a few times, creating an informal round or oval shape—whatever shape fits your Dutch oven. Once you've got it somewhat gathered, use the edges of the parchment paper to flip the whole thing over. Now the floured side is on top and your loaf sits in the center of the parchment. Don't stress if it's not perfectly smooth or gorgeous on top. This isn't a competition.
- Take a very sharp knife or a clean razor blade and make 2-3 shallow slits across the top of your loaf, about ½ inch deep. I usually do a cross pattern, but you can do whatever makes you happy—straight lines, an X, whatever. These scores look beautiful and they give the bread room to expand as it bakes. This is totally optional, but I recommend it because the visual impact is fantastic.

- This is the only moment that requires a little care. Carefully remove your preheated Dutch oven from the oven (watch out—it's hot!). Take off the lid and set it aside. Now grab your parchment paper by the sides and gently place your dough into the hot Dutch oven. It should sizzle slightly—that's the sound of success. The dough will start cooking immediately from the heat of that pot.
- Place the Dutch oven lid back on and put the whole thing back in your 450-degree oven on the center rack. Bake for 35 minutes with the lid on (or 40 minutes if your dough came straight from the fridge). The lid keeps the steam trapped, which is creating that perfect crust.
- After your covered time, carefully remove the lid (watch for the steam!). You want the bread to bake uncovered for another 5-10 minutes until it turns a gorgeous golden brown color. If you want it darker and crunchier, go closer to 10 minutes. If you prefer a lighter crust, hit it at 5 minutes. The color will deepen slightly as it cools.
- Using the parchment paper sides or a pair of tongs, carefully remove your bread from the Dutch oven and place it on a wire rack or cutting board. This is where patience pays off. Wait at least 10 minutes before slicing, though 30 minutes to an hour is ideal if you can manage it. I know it's tempting to cut into it immediately—the steam rises off it so beautifully—but cutting it too soon will result in a gummy interior. The crumb needs time to set.

Nutrition
Notes
Tried this recipe?
Let us know how it was!FAQs
Why is my bread dense instead of airy?
Usually this means either your dough didn’t rise enough before baking, or your oven/Dutch oven wasn’t hot enough. Make sure you’re letting it rise until it’s visibly puffy and doubled. Also, that 20-minute extra preheat on the Dutch oven is non-negotiable—it’s what creates the steam that lifts the bread.
Can I make this without a Dutch oven?
You can, but you’ll lose that perfect crust. A regular covered baking dish (even an oven-safe pot with a lid) works in a pinch. Cast iron Dutch ovens are ideal, but enameled ones work equally well. The key is creating a steamy environment, so the lid is essential.
My dough never rose. What happened?
Either your yeast was dead or your water temperature killed it. Check your yeast’s expiration date—old yeast won’t activate. Also, water above 120 degrees kills yeast instantly. If you’re unsure about water temperature, room temperature works fine (takes longer but works). Next time, test a pinch of yeast in warm water first—it should bubble up within 5-10 minutes.
How do I know if my bread is done baking?
Look for a deep golden-brown color. You can also tap the bottom of the loaf—it should sound hollow. Some bakers use a meat thermometer, inserting it into the center; it should read around 205-210 degrees Fahrenheit when fully baked.
Can I add mix-ins like seeds, herbs, or cheese?
Absolutely. Add 2-3 tablespoons of sesame seeds, flax seeds, or poppy seeds to your wet dough. For herbs, use 1 tablespoon of dried herbs (rosemary and thyme are lovely) or 2 tablespoons of fresh herbs. For cheese, add ½ cup of grated cheddar or parmesan. Fold these in after your initial rise but before shaping.
More Recipes You’ll Love
- this simple cake – A classic that deserves a spot next to your homemade bread for special occasions
- Bean And Quinoa Recipe – Pair warm slices of this bread with a hearty grain bowl for complete nutrition
- BBQ Chicken Baked In Oven Recipe – The perfect protein to serve alongside warm bread for a satisfying dinner
Here’s the honest truth: making bread at home sounds fancier than it actually is. You’re mixing five ingredients, waiting a few hours, and letting heat do the heavy lifting. The result is bread that tastes better than most bakery loaves, costs a fraction of the price, and fills your home with the most incredible smell. That’s not just baking—that’s creating something real in your kitchen. Once you nail this recipe, you’ll be making it regularly. Your family will start expecting it. Your neighbors might start asking questions.
The beauty of this recipe is that it removes excuses. You don’t have a fancy stand mixer? You don’t need one. You don’t have special baking skills? This doesn’t require them. You’ve got warm water, flour, yeast, and salt. You’ve got a Dutch oven and an oven. You’ve got everything you need to make restaurant-quality bread at home.
Start today. Mix your dough, set your timer, and let the magic happen. I promise you’ll be amazed at what comes out of your oven. Happy cooking!