You know that Trader Joe’s Buffalo Chicken Meatballs slider situation? The one that’s become a go-to party appetizer everyone whispers about? I’ve been obsessed with figuring out how to recreate them at home—and honestly, I’ve cracked the code. What started as a casual weekend experiment turned into something I now make constantly. These sliders hit that perfect sweet spot between tangy buffalo sauce, creamy blue cheese, and those incredibly tender meatballs. The best part? Making them at home costs a fraction of what you’d spend buying them repeatedly, and you can customize every single layer.
I’ve spent years as a dietitian figuring out how restaurants engineer their signature dishes, and these meatball sliders are a masterclass in flavor layering. Once you understand the technique, you’ll never go back to just eating them straight from the package. This homemade version is fresher, more customizable, and honestly tastes better than the original.
Copycat Trader Joe’s Buffalo Chicken Meatball Sliders That Taste Better Than the Store Version
I first became obsessed with these sliders at a neighborhood gathering about three years ago. Someone brought them, and I must have eaten six before I even realized what I was doing. The combination of spicy-tangy buffalo with cool, creamy blue cheese dressing, crispy-yet-soft rolls, and that surprising snap of fresh lettuce and tomato—it was addictive. But here’s the thing: I started calculating the cost of buying them regularly, and my wallet actually hurt.
That’s when I decided to reverse-engineer them. I bought a package of the frozen buffalo meatballs and spent an entire evening studying the ingredient list, analyzing the texture, tasting every element separately. Then I started experimenting with how restaurants layer these sliders for maximum impact. After testing different assembly methods, sauce ratios, and cooking techniques, I created a version that honestly beats the original. It’s fresher, you control the heat level, and you can load them with as many toppings as you want.
What Makes the Restaurant Version So Good
The Trader Joe’s version is genuinely delicious, and there’s a reason people keep buying them. But once you understand what makes them work, you can make something even better at home. The magic comes down to a few specific elements that work together perfectly.
First, there’s the sauce itself—that Frank’s hot sauce base isn’t just any buffalo sauce. It’s thin, vinegary, and gets that distinctive flavor from the specific hot peppers Frank’s uses. Second, the meatballs themselves are pre-cooked, which means they’re already seasoned and ready to absorb the buffalo coating. Third, there’s the strategic use of blue cheese in multiple forms: dressing brushed on the rolls, crumbled on top, and available for dipping. That repetition of the same flavor element creates coherence.
- The Buffalo Base – that specific vinegary heat from Frank’s hot sauce, which is different from cayenne-based sauces. It cuts through the richness and keeps your palate interested with every bite.
- The Textural Contrast – soft meatballs against crispy-toasted roll tops, cool lettuce and tomato against warm cheese, and creamy dressing against spicy sauce. Every bite has multiple textures happening simultaneously.
- The Strategic Toasting – most people don’t realize the rolls are baked until golden. This creates a structural integrity that keeps them from falling apart while eating, plus it develops a subtle sweetness that balances the spice.
How This Homemade Version Compares
Here’s my honest assessment after making these dozens of times: the homemade version wins on freshness, customization, and cost. Your lettuce and tomato are actually crisp instead of slightly wilted. You can adjust the heat level—add more Frank’s sauce if you like it spicier, or tone it down if you’re feeding heat-sensitive guests. You can load up toppings without guilt because you’re not paying restaurant prices.
Where the restaurant version wins? Convenience and consistency. They’ve perfected the assembly process through repetition. But honestly? Once you make these at home once, the five-minute assembly time becomes second nature. You’ll find yourself making them more often than you’d buy them because it’s so simple.
The nutrition profile is actually pretty solid when you break it down. Yes, there’s cheese and butter, but you’re getting protein from the chicken meatballs, vegetables from the fresh toppings, and you control the amount of dressing and sauce. As a dietitian, I appreciate being able to see exactly what’s going into my food.
The Ingredients—Reverse-Engineered
I spent weeks testing different ingredient combinations to nail this recipe. Each component needed to serve a specific purpose: the sauce had to cling to the meatballs without sliding off, the butter needed to toast the rolls perfectly, and the blue cheese elements needed to layer without overwhelming the palate. Here’s what I discovered works best, with explanations for why each ingredient matters.
For the Meatballs and Sauce
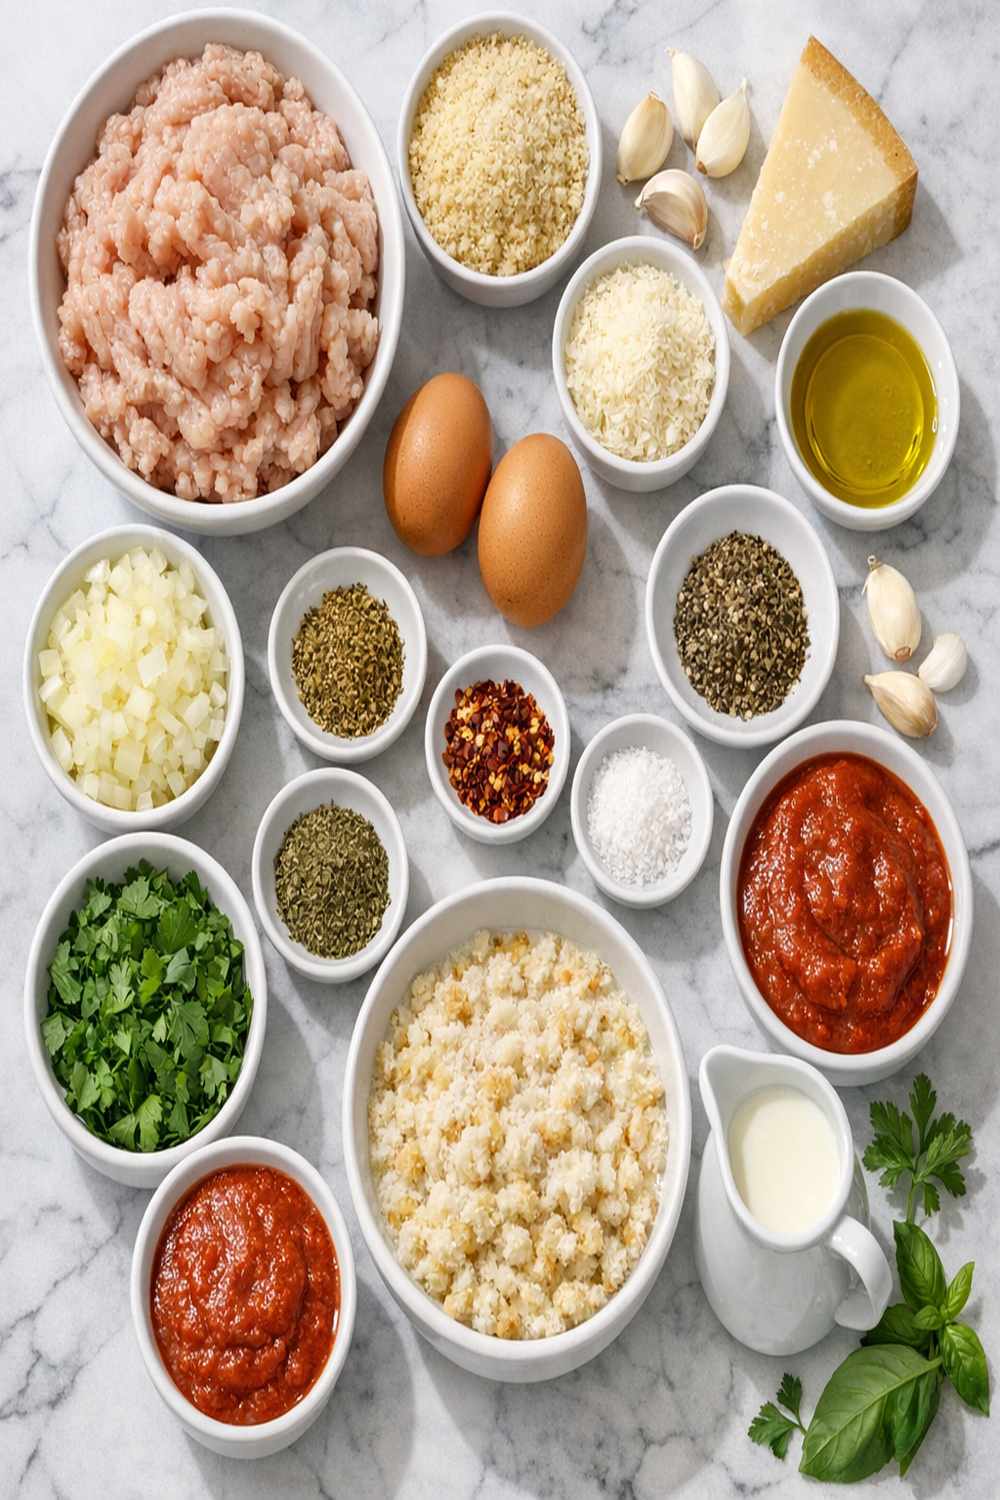
- ¼ cup Frank’s RedHot sauce (the original version; this specific brand creates the authentic vinegary heat)
- 1 package frozen buffalo-style chicken meatballs from Trader Joe’s (about 12 meatballs; pre-seasoned with buffalo flavoring)
- 3 tablespoons salted butter, divided (for the sauce and brushing)
For the Sliders
- ¼ cup blue cheese dressing, plus additional for serving (this should be a quality bottled version or homemade)
- 1 package Hawaiian sweet rolls with 12 individual rolls (the slight sweetness balances the spice perfectly)
- 6 slices provolone cheese (mild enough not to compete with the buffalo flavoring)
- ¼ cup crumbled blue cheese (for topping; adds sharp flavor and texture)
For the Fresh Toppings
- ½ white onion, thinly sliced (sharp and fresh; red onion works too if you prefer milder flavor)
- 1 small tomato, thinly sliced (choose a ripe but firm tomato so it doesn’t make the rolls soggy)
- 1 cup crisp shredded lettuce (iceberg works best for crunch; avoid pre-shredded if possible)
For the Garlic Butter Finish
- 1 teaspoon fresh flat-leaf parsley, finely chopped (this adds a subtle herbaceous note that finishes the dish)
- 2 cloves fresh garlic, minced very fine (not from a jar; fresh garlic creates better browning)
- 3 tablespoons salted butter (melted and infused with garlic for brushing the tops)
Makes 12 sliders (serves 4-6 as a main course appetizer, or 12 as a party appetizer)
The Copycat Method: How to Recreate Trader Joe’s Buffalo Chicken Meatball Sliders at Home
I’m going to walk you through this step-by-step the way professional kitchens approach it. The order matters more than you’d think. By doing things in a specific sequence, you’re building layers of flavor while managing moisture and texture. This isn’t complicated, but there’s a method to it.
Step 1: Prepare Your Workspace and Preheat the Oven
Start by preheating your oven to 350°F. This temperature is key—too hot and your roll tops will burn before the cheese melts inside. 350°F gives you that golden-brown exterior without charring. While the oven heats, grab a 9×13-inch baking dish. This size is perfect for the rolls to fit snugly, which helps them bake evenly and stay moist inside while the tops crisp up. Have all your ingredients prepped and within arm’s reach before you start cooking the meatballs. Restaurant kitchens call this mise en place—everything in its place—and it makes assembly exponentially faster and less stressful.

Step 2: Make the Buffalo Sauce Base
Pour ¼ cup of Frank’s RedHot sauce into a medium mixing bowl. Add 2 tablespoons of salted butter to the same bowl. Now here’s the professional technique: microwave this combination for 30-60 seconds until the butter is completely melted. The reason I’m not having you do this in a saucepan is that you need the butter to fully incorporate into the vinegary sauce, and microwaving actually creates a better emulsion than stovetop heating would at this small scale. Once it’s heated, whisk vigorously for about 15 seconds. You should see the sauce get slightly lighter in color and become more uniform. Set this aside—you’ll use it in just a moment.
Step 3: Cook the Meatballs Until Heated Through
This is where most homemade versions fall short. People either skip cooking them or use the oven, which takes forever. Use an air fryer at 400°F for 4-6 minutes. Why the air fryer? It heats the meatballs evenly without drying them out, and it creates a slightly firmer exterior that helps them hold together when you’re tossing them in sauce and assembling the sliders. If you don’t have an air fryer, use a 400°F oven for about 8-10 minutes instead. Just keep an eye on them—you want them heated through and slightly warmed on the outside, not dried out.

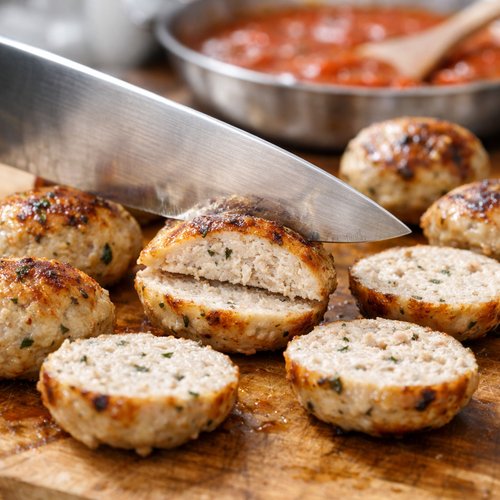
Step 4: Slice and Sauce the Meatballs
While the meatballs are cooking, here’s a crucial step that changes everything: slice each meatball in half horizontally. This doubles the surface area that the sauce can coat, and it also helps the meatballs nestle better into the rolls. Once they’re sliced and slightly cooled (about 30 seconds), transfer them to your mixing bowl with the buffalo sauce. Toss gently but thoroughly—every meatball half should be coated with that spiced, buttery sauce. The residual heat will keep the sauce coating thin and clingy instead of pooling at the bottom of the bowl.
Step 5: Prepare the Roll Bases
Take your package of Hawaiian sweet rolls and, using a long serrated knife, carefully cut horizontally to separate the tops from the bottoms. The way to do this without squishing them is to use a gentle sawing motion and let the knife do the work—don’t press down. You should end up with 12 bottom halves and 12 top halves. Place all the bottom halves in your baking dish, laying them out in a single layer. They should fit snugly but not be squished together.
Step 6: Build the First Layer
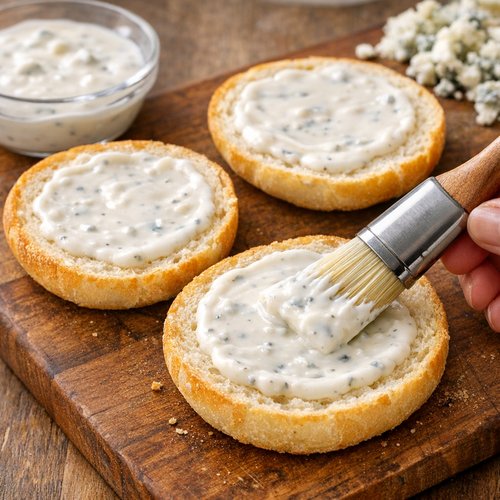
Here’s where the blue cheese dressing comes in strategically. Brush each bottom roll half with a thin layer of blue cheese dressing. You want about ½ teaspoon per roll—enough to flavor it but not so much that it soaks through the bread before the sliders even get assembled. This dressing acts as a moisture barrier and flavor foundation. Think of it like the sauce on a sandwich—it’s intentional and measured.
Step 7: Add the Meatballs and Cheese
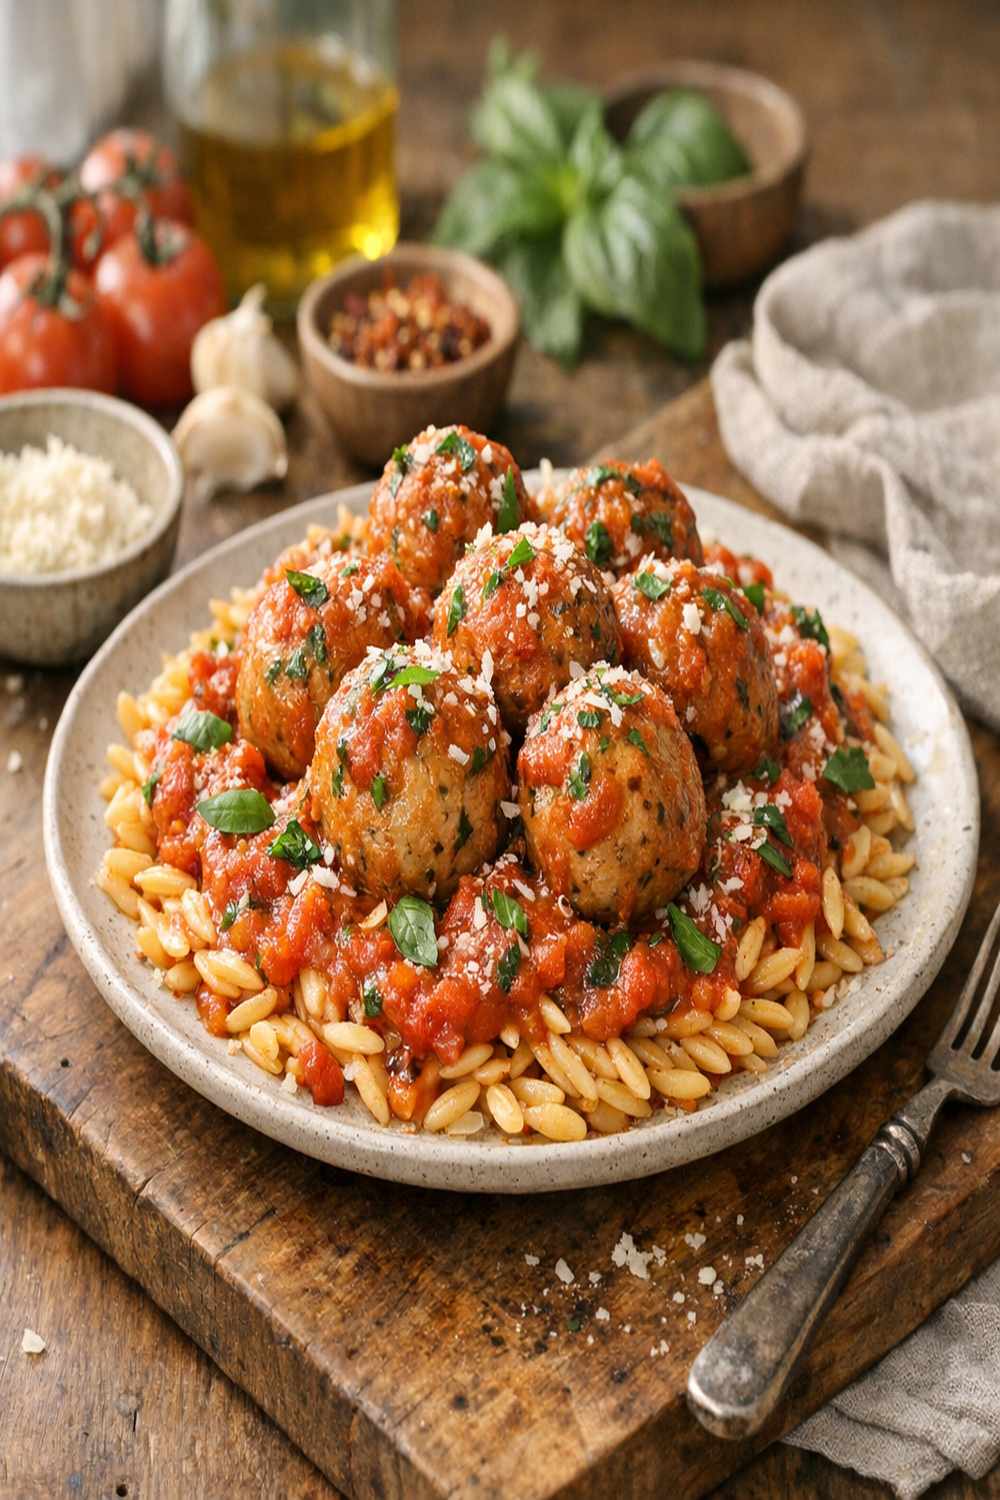
Divide your sauced meatball halves evenly among the rolls—you should get about 4 meatball halves per slider. Nestle them onto the dressing base. Now add a slice of provolone cheese directly on top of the meatballs. The heat from the meatballs will start softening it immediately, which means it’ll meld beautifully when the sliders bake. Top the provolone with a small handful of shredded lettuce, 2-3 tomato slices, and a few onion slices. Finish with a small sprinkle of crumbled blue cheese on each one.
Step 8: Add the Roll Tops
This seems simple, but placement matters slightly. Lay the top halves of the rolls directly over the filled bottoms. Press down very gently so they nestle together. Don’t press hard—you’re not making a panini. You just want them to sit together naturally.
Step 9: Make the Garlic Butter Topping
In a small saucepan, melt 3 tablespoons of salted butter over medium-low heat. Once it’s melted and foaming slightly, add your 2 minced garlic cloves. The key here is sautéing the garlic for exactly 1 minute until it becomes fragrant but doesn’t brown. If garlic browns, it turns bitter—you want that sweet, nutty roasted flavor. Once it’s fragrant, immediately remove from heat and stir in 1 teaspoon of finely chopped fresh parsley. The residual heat will warm the parsley and release its oils.
Step 10: Brush and Bake
Using a pastry brush, coat the top of each roll with the garlic butter mixture. You don’t need to be heavy-handed—just enough to give them a light coating. This is what creates that beautiful golden-brown finish. Pop the baking dish into your preheated 350°F oven for 12-15 minutes. You’re looking for the roll tops to turn a deep golden brown and the cheese to melt underneath. Start checking around the 10-minute mark so you don’t overbake them.
Step 11: Final Finish and Serving
Remove from the oven and immediately brush the roll tops one more time with any remaining garlic butter. Then, using a sharp knife, carefully cut between each slider to separate them. The sliders should still be warm, the cheese should be melted, and the roll tops should be crispy. Serve immediately with extra blue cheese dressing on the side for dipping.
The Secret Sauce: Understanding the Frank’s Buffalo Base
Let me talk about why Frank’s RedHot is non-negotiable for this recipe. I tested this with other hot sauces—Tabasco, generic buffalo sauce, even homemade versions—and none of them replicated the original flavor. Here’s why Frank’s is different: it uses a proprietary blend of cayenne peppers and vinegar with a specific ratio that creates that distinctive tangy-spicy flavor profile. It’s thinner than most hot sauces, which means it coats food differently. It also has a subtle sweetness that balances the heat.
The ¼ cup measurement is crucial. Too little and the flavor gets lost when you add it to the butter and toss it with the meatballs. Too much and it becomes aggressively spicy instead of balanced. The 2 tablespoons of butter isn’t just for richness—it’s for emulsification. When you whisk hot sauce with melted butter, the fat molecules actually help distribute the spicy compounds more evenly across each meatball. This is why the restaurant version is so uniformly flavored.
Pro tip from my kitchen: if you prefer a milder version, use 3 tablespoons of Frank’s and add 1 tablespoon of water to maintain the sauce consistency. For a spicier version, use ¼ cup Frank’s but add an extra ½ teaspoon of hot sauce to the finishing brush. The key is adjusting proportionally so you don’t throw off the emulsion.
How to Make It Even Better Than the Original
- Use Fresh Blue Cheese Instead of Just Dressing – quality bottled blue cheese dressing is fine, but combining it with freshly crumbled blue cheese creates a more complex, sharper flavor that elevates the whole slider. Look for Danish blue or Point Reyes blue cheese from your local cheese counter. One 4-ounce wedge costs about $6 and makes enough crumbles for multiple batches.
- Toast Your Rolls Separately First – here’s a professional trick: brush the cut sides of your rolls with a tiny bit of melted butter and toast them in a 400°F oven for 2-3 minutes before assembly. This creates a barrier that prevents the sliders from getting soggy from the dressing. It also adds a subtle crunch that the original doesn’t have.
- Add a Spicy Kick with Fresh Jalapeños – slice 1-2 fresh jalapeños thinly and layer them on top of the provolone before adding lettuce. It adds fresh heat that complements the Frank’s sauce perfectly and gives you more complexity than the original.
- Use Whole Grain Mustard as an Upgrade – mix 1 tablespoon of whole grain mustard with your blue cheese dressing for the base layer. The mustard’s sharp, tangy flavor deepens the overall profile and adds something the original lacks.
- Finish with Fresh Microgreens – after baking, add a small handful of peppery microgreens on top of each slider right before serving. This adds nutritional value (microgreens are calorie-light but nutrient-dense) and gives you a fresh, peppery note that contrasts beautifully with the warm, cheesy interior.
Cost Comparison: Home vs Restaurant
Let me break down the actual numbers because this is where homemade cooking becomes compelling. When you buy Trader Joe’s buffalo meatball sliders, you’re typically paying about $8-12 for a package that makes 6-8 sliders. That’s roughly $1.25-2 per slider at retail.
Here’s what you’re spending when you make them at home: One package of Trader Joe’s frozen buffalo meatballs ($5), one package of Hawaiian rolls ($3), provolone slices ($3 for a pack that has 12), crumbled blue cheese ($4 for enough for multiple batches, so let’s say $1 per batch), blue cheese dressing ($3.50 for a bottle that makes 4+ batches, so about 85 cents per batch), fresh vegetables ($2-3), butter ($0.50 for what you use), garlic ($0.25), and parsley ($0.50). Total: approximately $18.50 for 12 sliders, or about $1.54 per slider.
Wait—that’s more expensive per slider. But here’s the thing: you get better quality ingredients (fresh vegetables instead of slightly wilted ones), more control (you choose how much of everything goes in), and more sliders (you’re making 12 instead of 6-8). Plus, that $3.50 bottle of blue cheese dressing makes multiple batches, so subsequent batches cost less. If you make these twice a month, you’re looking at savings of about $30-40 annually versus buying them consistently.
The real value isn’t just financial—it’s in how much better they taste when ingredients are fresher and assembled minutes before eating.
Can I Store Trader Joe’s Buffalo Chicken Meatball Sliders?
Assembled sliders keep in the refrigerator for up to 2 days if wrapped tightly in plastic wrap or stored in an airtight container. The challenge is that the rolls absorb moisture from the cheese and fillings, so they won’t be quite as crispy on day two. They’re still delicious, just slightly softer. I recommend storing components separately if you’re planning to eat them over multiple days.
Cooked (fully baked) sliders keep for 3-4 days in an airtight container. You can reheat them gently in a 300°F oven for about 5-8 minutes until warmed through. Don’t use the microwave—it makes the rolls rubbery.
Uncooked assembled sliders (before the final bake) can be covered and refrigerated for up to 8 hours. This is actually perfect for meal prep. Assemble them in the morning, cover with plastic wrap, and bake when you’re ready to eat. Just add about 2-3 minutes to the baking time if they’re coming straight from the fridge.
Frozen storage: You can freeze uncooked assembled sliders in the baking dish (covered tightly with plastic wrap and then foil) for up to 1 month. Bake directly from frozen at 350°F for 18-20 minutes. There will be a slight texture difference, but it’s acceptable if you’re using them for entertaining.
Pro tip: Don’t freeze the fresh vegetable toppings separately—they’ll get mushy. Freeze the sliders with all components intact, and the lettuce and tomato will stay firmer than if frozen alone.
Expert’s Nutritional Tip: Balancing Indulgence with Nutrition
As a dietitian, I want to talk about something important here. These sliders contain cheese, butter, and dressing—they’re not a “healthy” appetizer in the weight-loss sense. But they’re absolutely part of a balanced diet, and here’s why I’m not concerned: each slider contains roughly 8-10 grams of protein from the chicken meatballs and cheese, plus about 2 grams of fiber from the lettuce and tomato, and they’re nutrient-dense due to the vegetables and cheese (which provides calcium and phosphorus).
The key is portion context. These work beautifully as part of a meal where you’re serving other components—a salad, roasted vegetables, or a light soup alongside them reduces the overall caloric density of the meal. If you’re serving them as appetizers at a party, people naturally eat 1-2, not 6. The butter and dressing aren’t your enemy—they add satiety, which means you’ll feel satisfied with a reasonable portion and won’t overeat later.
What I always tell clients: eating real food made with recognizable ingredients (butter, cheese, vegetables) is metabolically different from eating ultra-processed approximations. Your body knows what to do with Frank’s hot sauce and blue cheese. It processes them efficiently. So make these, enjoy them, and let go of the guilt.
Make-Ahead Guide: Preparing These for a Crowd
If you’re making these for an event, here’s my professional make-ahead strategy that keeps them fresh and delicious:
Two Days Before
Purchase all non-perishable ingredients: meatballs (if you want frozen), rolls, hot sauce, butter. This gives you time to acquire everything without last-minute shopping stress.
One Day Before
Prep your vegetables: wash and dry your lettuce thoroughly (moisture is the enemy of crispness), slice your tomato and onion, and store them separately in airtight containers. You can mince your garlic and parsley now too. Cover the garlic and parsley separately with plastic wrap or store them in small containers.
Day Of (4-6 Hours Before Serving)
Remove your frozen meatballs from the freezer to the refrigerator so they thaw gently. Prepare your baking dish—just set it out with the roll bottoms already arranged inside (they won’t dry out in 4-6 hours). Have your blue cheese dressing, crumbled blue cheese, and provolone slices ready to go. Get your garlic butter ingredients measured and within reach.
One Hour Before Serving
Preheat your oven, cook your meatballs, make your sauce, and begin assembly. The entire assembly-to-bake process takes about 10 minutes. Bake them 15 minutes before you want to serve, so they come out hot and crispy.
Common Mistakes to Avoid
Mistake 1: Cutting the Rolls Too Roughly
If you use a regular serrated bread knife with a hacking motion, you’ll squish the rolls into dense, compressed discs. Use a long serrated knife and employ a gentle sawing motion with minimal downward pressure. Let the knife’s teeth do the cutting work. You should hear a soft whisper of a crunch, not a crunch-crack-crunch sound.
Mistake 2: Overstuffing the Sliders
More isn’t always better. If you pile vegetables and toppings too high, you’ll have structural failure—the rolls will collapse when you try to eat them. Stick to about ½ cup of lettuce per slider, 2-3 tomato slices, and a small handful of onion. This creates layers without creating a tower that falls apart in your hand.
Mistake 3: Not Prepping Components Separately
If you chop your tomato and lettuce hours in advance and mix them together, they’ll become a sad, wet pile by assembly time. Keep everything separate in airtight containers until the moment before you assemble. This 30-second difference in timing creates a dramatic difference in quality.
Mistake 4: Using Cold Meatballs
If you grab the meatballs straight from the freezer and try to toss them in sauce, you’ll end up with a grainy, mealy texture. Always cook them first—the heat actually changes the protein structure and helps them accept the sauce coating. Even a few minutes of heating makes a textural difference you can definitely taste.
Seasonal Variations: Adapt This Recipe Year-Round
Spring Version
Replace some of the iceberg lettuce with fresh arugula (peppery and tender). Add thin slices of fresh radish for crunch. Microgreens become your friend in spring—they add nutrition and a fresh, bright element. Keep the blue cheese because it grounds the lighter spring flavors.
Summer Version
This is when tomatoes are at their absolute peak. Use heirloom varieties if you can find them at farmers’ markets. Add grilled corn kernels (fresh or frozen and warmed) between the provolone and lettuce. Consider adding fresh cilantro instead of parsley in the garlic butter—it adds a bright, citrusy note that works beautifully with buffalo sauce.
Fall Version
Add roasted red peppers (from a jar is perfectly fine) for sweetness and color. Use a sharper blue cheese variety if available (fall is blue cheese season, and the selections are more robust). Add crispy bacon crumbles to the toppings. The Frank’s sauce feels even better paired with these autumn-inflected ingredients.
Winter Version
Shred cabbage instead of using lettuce—it’s more substantial and holds up better in colder weather. Add thinly sliced apple or pear for a sweet contrast (Granny Smith apples are perfect because they’re tart). Consider adding caramelized onions in addition to the raw onion for depth and sweetness.
What to Order/Make Alongside for the Full Experience
If you’re making these sliders as the centerpiece of a meal, here’s what I’d serve alongside them to create a complete, balanced plate: a crisp salad with a light vinaigrette (the acidity cuts through the richness of the sliders beautifully), roasted or grilled vegetables, and something cool like a yogurt-based dip or cooling beverage.
For a party, these pair wonderfully with a high-protein chicken burrito recipe setup where people can build their own, or you could balance them with lighter protein options like BBQ salmon recipe cooked in your broiler. If you’re doing a seafood-forward menu, baked haddock recipe offers a lighter contrast to the richness of these sliders.
- Buffalo Vegetable Dip – serve a creamy dip made with Greek yogurt, Frank’s hot sauce, and blue cheese. It bridges flavors and gives people another textural option for dipping vegetables or chips.
- Cooling Side Salad – mixed greens with ranch dressing. The cool, creamy ranch balances the warm, spicy sliders perfectly.
- Sweet Potato Fries or Regular Fries – something carb-based that complements the protein. The slight sweetness of sweet potato works surprisingly well with buffalo flavors.
- Celery and Carrot Sticks with Blue Cheese Dip – classic buffalo accompaniment that adds crunch and freshness, and gives people a lighter option alongside the sliders.
Trader Joe's Chicken Meatballs Recipe
Ingredients
Method
- Start by preheating your oven to 350°F. This temperature is key—too hot and your roll tops will burn before the cheese melts inside. 350°F gives you that golden-brown exterior without charring. While the oven heats, grab a 9x13-inch baking dish. This size is perfect for the rolls to fit snugly, which helps them bake evenly and stay moist inside while the tops crisp up. Have all your ingredients prepped and within arm's reach before you start cooking the meatballs. Restaurant kitchens call this mise en place—everything in its place—and it makes assembly exponentially faster and less stressful.

- Pour ¼ cup of Frank's RedHot sauce into a medium mixing bowl. Add 2 tablespoons of salted butter to the same bowl. Now here's the professional technique: microwave this combination for 30-60 seconds until the butter is completely melted. The reason I'm not having you do this in a saucepan is that you need the butter to fully incorporate into the vinegary sauce, and microwaving actually creates a better emulsion than stovetop heating would at this small scale. Once it's heated, whisk vigorously for about 15 seconds. You should see the sauce get slightly lighter in color and become more uniform. Set this aside—you'll use it in just a moment.
- This is where most homemade versions fall short. People either skip cooking them or use the oven, which takes forever. Use an air fryer at 400°F for 4-6 minutes. Why the air fryer? It heats the meatballs evenly without drying them out, and it creates a slightly firmer exterior that helps them hold together when you're tossing them in sauce and assembling the sliders. If you don't have an air fryer, use a 400°F oven for about 8-10 minutes instead. Just keep an eye on them—you want them heated through and slightly warmed on the outside, not dried out.

- While the meatballs are cooking, here's a crucial step that changes everything: slice each meatball in half horizontally. This doubles the surface area that the sauce can coat, and it also helps the meatballs nestle better into the rolls. Once they're sliced and slightly cooled (about 30 seconds), transfer them to your mixing bowl with the buffalo sauce. Toss gently but thoroughly—every meatball half should be coated with that spiced, buttery sauce. The residual heat will keep the sauce coating thin and clingy instead of pooling at the bottom of the bowl.
- Take your package of Hawaiian sweet rolls and, using a long serrated knife, carefully cut horizontally to separate the tops from the bottoms. The way to do this without squishing them is to use a gentle sawing motion and let the knife do the work—don't press down. You should end up with 12 bottom halves and 12 top halves. Place all the bottom halves in your baking dish, laying them out in a single layer. They should fit snugly but not be squished together.

- Here's where the blue cheese dressing comes in strategically. Brush each bottom roll half with a thin layer of blue cheese dressing. You want about ½ teaspoon per roll—enough to flavor it but not so much that it soaks through the bread before the sliders even get assembled. This dressing acts as a moisture barrier and flavor foundation. Think of it like the sauce on a sandwich—it's intentional and measured.
- Divide your sauced meatball halves evenly among the rolls—you should get about 4 meatball halves per slider. Nestle them onto the dressing base. Now add a slice of provolone cheese directly on top of the meatballs. The heat from the meatballs will start softening it immediately, which means it'll meld beautifully when the sliders bake. Top the provolone with a small handful of shredded lettuce, 2-3 tomato slices, and a few onion slices. Finish with a small sprinkle of crumbled blue cheese on each one.
- This seems simple, but placement matters slightly. Lay the top halves of the rolls directly over the filled bottoms. Press down very gently so they nestle together. Don't press hard—you're not making a panini. You just want them to sit together naturally.

- In a small saucepan, melt 3 tablespoons of salted butter over medium-low heat. Once it's melted and foaming slightly, add your 2 minced garlic cloves. The key here is sautéing the garlic for exactly 1 minute until it becomes fragrant but doesn't brown. If garlic browns, it turns bitter—you want that sweet, nutty roasted flavor. Once it's fragrant, immediately remove from heat and stir in 1 teaspoon of finely chopped fresh parsley. The residual heat will warm the parsley and release its oils.
- Using a pastry brush, coat the top of each roll with the garlic butter mixture. You don't need to be heavy-handed—just enough to give them a light coating. This is what creates that beautiful golden-brown finish. Pop the baking dish into your preheated 350°F oven for 12-15 minutes. You're looking for the roll tops to turn a deep golden brown and the cheese to melt underneath. Start checking around the 10-minute mark so you don't overbake them.
- Remove from the oven and immediately brush the roll tops one more time with any remaining garlic butter. Then, using a sharp knife, carefully cut between each slider to separate them. The sliders should still be warm, the cheese should be melted, and the roll tops should be crispy. Serve immediately with extra blue cheese dressing on the side for dipping.
Tried this recipe?
Let us know how it was!FAQs
Can I use fresh chicken to make the meatballs instead of the Trader Joe’s frozen ones?
Absolutely, though it requires extra work. You’d need to make meatballs from ground chicken (about 1 pound for this recipe), season them with salt, pepper, and a bit of buffalo seasoning powder if you can find it, then bake them at 400°F for about 15-18 minutes until cooked through. The challenge is that homemade chicken meatballs don’t have the same binding structure as commercial versions, so they can fall apart more easily when you slice them in half. If you go this route, chill the uncooked meatball mixture for at least 30 minutes before forming them, use a light egg binder, and handle them gently during cooking. That said, the Trader Joe’s version is honestly superior for this recipe because it’s already perfectly seasoned and has the right texture. I’d suggest saving homemade meatballs for a different application.
What can I substitute for Frank’s hot sauce if I can’t find it or want a different flavor?
This is tricky because Frank’s is really specific in its flavor profile. If you absolutely can’t find it, Tabasco sauce mixed with melted butter (1 tablespoon Tabasco with 3 tablespoons butter) gets you closer than straight buffalo sauce would. For a different direction entirely, you could use a garlic hot sauce (like Louisiana-style hot sauce) or even a sriracha-butter combination for an Asian-inspired version. But I want to be honest: it won’t taste like the original. Frank’s is widely available at virtually every grocery store, so I’d recommend hunting for it rather than substituting. It’s worth having a bottle in your pantry anyway for buffalo chicken dips and wing recipes.
How do I know if I’m cooking the meatballs long enough in the air fryer?
The meatballs should be heated completely through, which you can test with an instant-read thermometer—they should reach 165°F internally for food safety. But for eating quality, you want them hot enough that when you slice them, steam rises slightly from the cut surface. At 400°F in an air fryer, 4-6 minutes is usually right, but air fryers vary in power. The first time you make these, check one meatball at the 4-minute mark by cutting it in half. If it’s still cold in the center, add another minute or two. By your second batch, you’ll know exactly your air fryer’s timing.
Can I make the garlic butter ahead of time?
Yes, but there’s a caveat. You can make it up to 4 hours in advance and store it in a small glass container at room temperature. However, if you make it more than 4 hours