
Ingredients
Method
Step 1: Prepare Your Workspace and Preheat the Oven
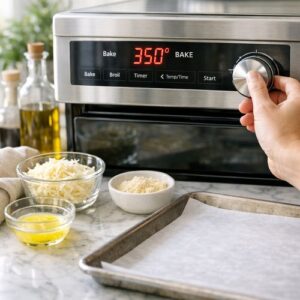
- Start by preheating your oven to 350°F. This temperature is key—too hot and your roll tops will burn before the cheese melts inside. 350°F gives you that golden-brown exterior without charring. While the oven heats, grab a 9x13-inch baking dish. This size is perfect for the rolls to fit snugly, which helps them bake evenly and stay moist inside while the tops crisp up. Have all your ingredients prepped and within arm's reach before you start cooking the meatballs. Restaurant kitchens call this mise en place—everything in its place—and it makes assembly exponentially faster and less stressful.
Step 2: Make the Buffalo Sauce Base
- Pour ¼ cup of Frank's RedHot sauce into a medium mixing bowl. Add 2 tablespoons of salted butter to the same bowl. Now here's the professional technique: microwave this combination for 30-60 seconds until the butter is completely melted. The reason I'm not having you do this in a saucepan is that you need the butter to fully incorporate into the vinegary sauce, and microwaving actually creates a better emulsion than stovetop heating would at this small scale. Once it's heated, whisk vigorously for about 15 seconds. You should see the sauce get slightly lighter in color and become more uniform. Set this aside—you'll use it in just a moment.
Step 3: Cook the Meatballs Until Heated Through
- This is where most homemade versions fall short. People either skip cooking them or use the oven, which takes forever. Use an air fryer at 400°F for 4-6 minutes. Why the air fryer? It heats the meatballs evenly without drying them out, and it creates a slightly firmer exterior that helps them hold together when you're tossing them in sauce and assembling the sliders. If you don't have an air fryer, use a 400°F oven for about 8-10 minutes instead. Just keep an eye on them—you want them heated through and slightly warmed on the outside, not dried out.

Step 4: Slice and Sauce the Meatballs
- While the meatballs are cooking, here's a crucial step that changes everything: slice each meatball in half horizontally. This doubles the surface area that the sauce can coat, and it also helps the meatballs nestle better into the rolls. Once they're sliced and slightly cooled (about 30 seconds), transfer them to your mixing bowl with the buffalo sauce. Toss gently but thoroughly—every meatball half should be coated with that spiced, buttery sauce. The residual heat will keep the sauce coating thin and clingy instead of pooling at the bottom of the bowl.
Step 5: Prepare the Roll Bases
- Take your package of Hawaiian sweet rolls and, using a long serrated knife, carefully cut horizontally to separate the tops from the bottoms. The way to do this without squishing them is to use a gentle sawing motion and let the knife do the work—don't press down. You should end up with 12 bottom halves and 12 top halves. Place all the bottom halves in your baking dish, laying them out in a single layer. They should fit snugly but not be squished together.

Step 6: Build the First Layer
- Here's where the blue cheese dressing comes in strategically. Brush each bottom roll half with a thin layer of blue cheese dressing. You want about ½ teaspoon per roll—enough to flavor it but not so much that it soaks through the bread before the sliders even get assembled. This dressing acts as a moisture barrier and flavor foundation. Think of it like the sauce on a sandwich—it's intentional and measured.
Step 7: Add the Meatballs and Cheese
- Divide your sauced meatball halves evenly among the rolls—you should get about 4 meatball halves per slider. Nestle them onto the dressing base. Now add a slice of provolone cheese directly on top of the meatballs. The heat from the meatballs will start softening it immediately, which means it'll meld beautifully when the sliders bake. Top the provolone with a small handful of shredded lettuce, 2-3 tomato slices, and a few onion slices. Finish with a small sprinkle of crumbled blue cheese on each one.
Step 8: Add the Roll Tops
- This seems simple, but placement matters slightly. Lay the top halves of the rolls directly over the filled bottoms. Press down very gently so they nestle together. Don't press hard—you're not making a panini. You just want them to sit together naturally.

Step 9: Make the Garlic Butter Topping
- In a small saucepan, melt 3 tablespoons of salted butter over medium-low heat. Once it's melted and foaming slightly, add your 2 minced garlic cloves. The key here is sautéing the garlic for exactly 1 minute until it becomes fragrant but doesn't brown. If garlic browns, it turns bitter—you want that sweet, nutty roasted flavor. Once it's fragrant, immediately remove from heat and stir in 1 teaspoon of finely chopped fresh parsley. The residual heat will warm the parsley and release its oils.
Step 10: Brush and Bake
- Using a pastry brush, coat the top of each roll with the garlic butter mixture. You don't need to be heavy-handed—just enough to give them a light coating. This is what creates that beautiful golden-brown finish. Pop the baking dish into your preheated 350°F oven for 12-15 minutes. You're looking for the roll tops to turn a deep golden brown and the cheese to melt underneath. Start checking around the 10-minute mark so you don't overbake them.
Step 11: Final Finish and Serving
- Remove from the oven and immediately brush the roll tops one more time with any remaining garlic butter. Then, using a sharp knife, carefully cut between each slider to separate them. The sliders should still be warm, the cheese should be melted, and the roll tops should be crispy. Serve immediately with extra blue cheese dressing on the side for dipping.