Learning to make arugula pesto isn’t just about this dish—it’s about mastering a technique that unlocks dozens of other recipes. Once you understand how to build and stabilize an emulsion, you’ll confidently make sheet pan Italian chicken with silky sauce, creamy salad dressings, and even better marinades. This single recipe teaches you the foundation of countless kitchen victories.
Master the Emulsification Technique (And Never Struggle With Sauces Again)
I remember the exact moment this clicked for me. It was a Tuesday afternoon in my New Hampshire kitchen, and I was making pesto for the third time that week. My sister had asked why some of mine came out velvety and gorgeous while hers always broke into an oily mess. I realized I’d never actually explained the why behind what I was doing—I’d just been following steps. That’s when I sat down and really understood emulsification, and suddenly everything made sense.
I stopped thinking about pesto as a recipe and started seeing it as a masterclass in binding oil and water-based ingredients into something that stays silky and cohesive. That shift changed how I approached cooking forever.
The Core Technique Explained
Emulsification is the process of suspending tiny droplets of oil throughout a water-based ingredient, creating a stable, creamy mixture. Normally, oil and water don’t mix—they’re chemically incompatible. But when you introduce an emulsifier (in pesto’s case, that’s the starch in nuts and the protein in Parmesan cheese) and blend them together slowly while gradually adding oil, something magical happens.
Here’s the science: as you process the nuts, you break their cell walls and release their natural oils and proteins. These proteins act like tiny bridges, surrounding oil droplets and preventing them from clumping together. When you drizzle olive oil in slowly while the food processor runs, you’re creating millions of microscopic oil droplets that stay suspended. Rush this step, dump all your oil in at once, and those droplets overwhelm the emulsifiers—everything separates and you’re left with a greasy puddle on top.
Temperature, speed, and patience matter deeply here. This is why professional chefs make better pesto than most home cooks—they understand that emulsification isn’t about blending; it’s about respect for the chemistry happening inside that bowl.
What This Technique Unlocks
Once you master emulsification, you’ll recognize this same principle everywhere in the kitchen. Suddenly you’ll see connections between dishes that seemed totally unrelated. You’ll understand why certain sauces break and how to fix them. You’ll be able to improvise with confidence.
- Creamy salad dressings – the gradual whisking of oil into vinegar-based ingredients follows the exact same emulsification principle
- Herb-infused marinades – blending fresh herbs with oil slowly prevents separation and creates a better coating on proteins
- Mayonnaise and aioli – the ultimate emulsification test, where oil is incorporated into eggs drop by drop
- Compound butters with herbs – combining soft butter with finely chopped herbs uses similar binding principles
- Creamy pasta sauces – when you make a sauce by slowly adding oil to dairy or egg-based ingredients, you’re emulsifying
- Herb-forward hummus variations – blending tahini (sesame paste) with oil and herbs uses the same stabilizing technique
The Ingredients—Chosen to Teach the Technique
I’ve selected these ingredients specifically because each one plays a teaching role in the emulsification process. Nothing here is arbitrary. Every component demonstrates something important about how flavors work together and how structure matters in a sauce.
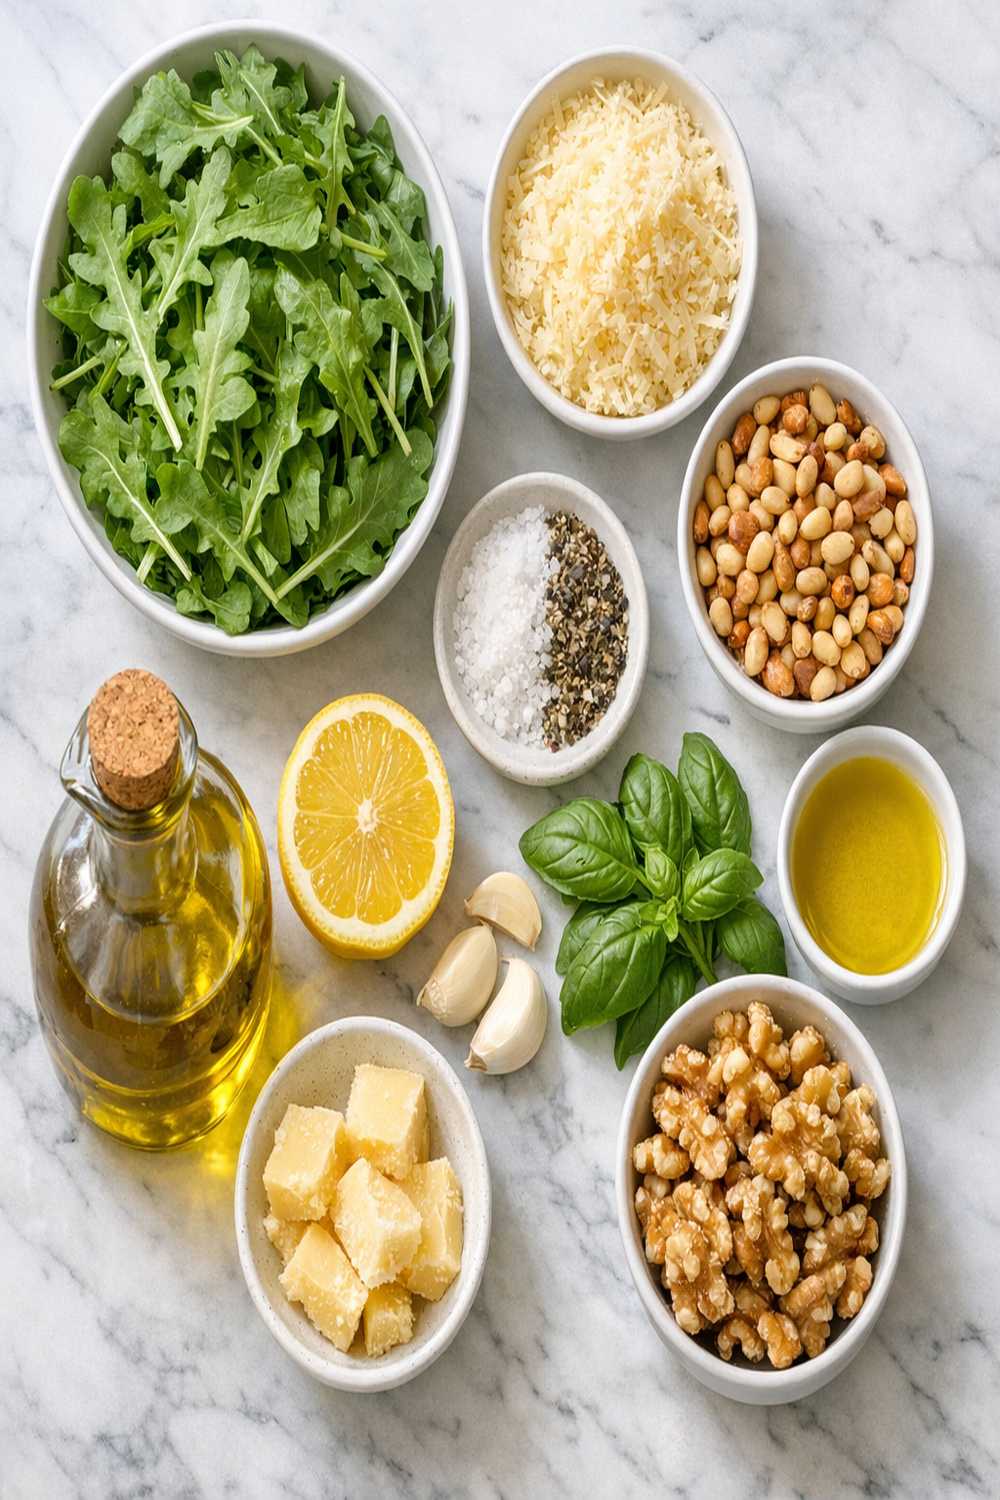
- 1/4 teaspoon fine sea salt (enhances all flavors and helps preserve the sauce during storage)
- 1 to 2 tablespoons fresh lemon juice (provides acidity that prevents oxidation and brightens flavors; the amount matters for balance)
- 2 1/2 ounces fresh arugula, about 3 cups loosely packed with thick stems removed (adds peppery bite and moisture to balance the richness of nuts and oil)
- 2 medium garlic cloves, peeled and roughly chopped (introduces sharpness that brightens the entire sauce)
- 2 tablespoons fresh mint or basil, finely chopped (optional but teaches you how to layer fresh herb flavors for complexity)
- 1/2 cup walnut or pecan halves (provides natural oils and proteins that act as emulsifiers; nuts are your stability foundation)
- 1/2 cup freshly grated Parmesan cheese (contributes protein for emulsification and umami depth that prevents the sauce from tasting one-dimensional)
- 1/2 cup extra-virgin olive oil (the star ingredient that gets incorporated slowly; quality matters since nothing masks inferior olive oil)
- 1 tablespoon toasted pine nuts, roughly chopped (optional garnish that demonstrates how texture variation improves the eating experience)
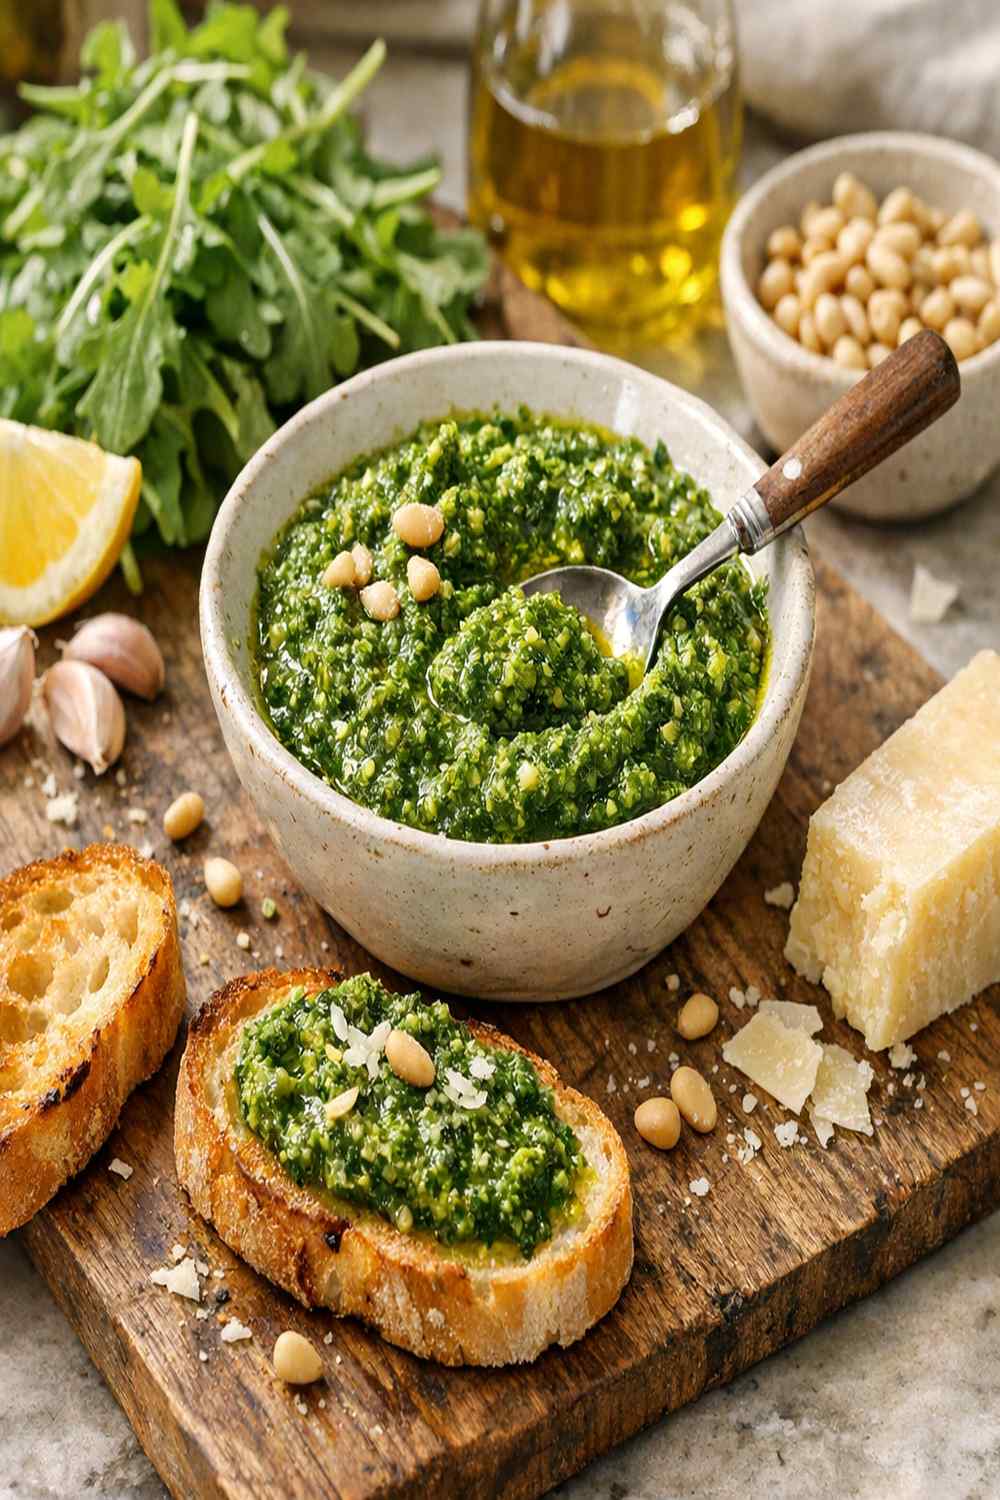
Makes approximately 1 cup of pesto (about 16 tablespoons, perfect for serving 4-6 people or storing for later use)
The Masterclass: How to Make Arugula Pesto Recipe
This isn’t just a recipe—it’s a technique tutorial. Pay attention to the sensory feedback at each step. Your eyes, ears, and instincts will tell you if you’re doing it right.
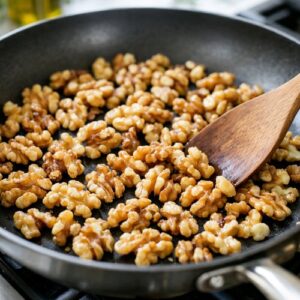
Step 1: Toast Your Nuts to Release Their Oils
Pour your walnuts or pecans into a large skillet and set the heat to medium. This is the first critical moment. You’re not trying to brown the nuts; you’re gently warming them to release their natural oils without damaging them with high heat. Stir frequently—this means every 30 seconds or so. Toasting usually takes 3 to 5 minutes, and you’ll know it’s working when the kitchen smells nutty and rich.
Why toast them? Raw nuts contain compounds that inhibit nutrient absorption. Toasting also makes their flavors more pronounced and concentrated. Plus, when nuts are warm, the oil releases more easily from the cell walls, creating a better emulsion base. This is the foundation of everything that follows.
Transfer the toasted nuts to your food processor and let them cool for a few minutes. Warm nuts process into nut butter too quickly, which isn’t what we want. We need them warm enough to release oils but cool enough to stay in pieces that will blend gradually with the other ingredients.

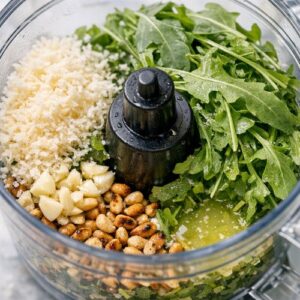
Step 2: Add Your Green Ingredients and Begin Breaking Down Structure
Once the nuts have cooled slightly, add the arugula, freshly grated Parmesan, roughly chopped garlic, and that initial tablespoon of lemon juice along with your salt. This is where you’re building layers—you’re combining your emulsifiers (nuts and cheese) with your flavor-builders (greens and acid) before introducing the oil.
Pulse the food processor a few times at this stage. You’re not trying to create a smooth paste yet. You want everything chopped and broken down enough that the particles can distribute evenly, but you’re not making baby food. This usually takes 6 to 8 pulses.
The arugula wilts down dramatically once you start processing it. That peppery green that seemed like a lot will compress into just a thin layer of flavor. This is exactly what you want—you’re concentrating the taste.

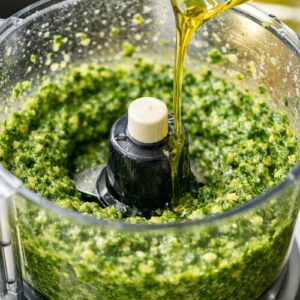
Step 3: The Critical Drizzle—Where Emulsification Happens
Now comes the technique moment that separates good pesto from broken pesto. Turn your food processor on and let it run continuously. While it’s running, drizzle your extra-virgin olive oil in slowly—we’re talking a thin, steady stream, not a pour. This is not the time to rush. Think of it like the food processor is holding a secret, and you’re coaxing it out slowly.
This process should take about 45 seconds to 1 minute total. Yes, you’ll feel like this is taking forever. That’s exactly right. As the oil drizzles in, the food processor is spinning and the protein-rich base you created is wrapping around each tiny oil droplet. The mixture gradually becomes creamy and thick.
If you dump all your oil in at once, the emulsion breaks. You’ll end up with a grainy, oily mess that looks curdled. If you stop too early, you’ll have something too thick that doesn’t coat food properly. The slow drizzle is the secret.
By the time you’ve added all the oil, your pesto should look silky, creamy, and mostly smooth with just a tiny bit of texture remaining. This is the sweet spot.

Step 4: Taste and Adjust—The Finishing Technique
Transfer your pesto to a bowl and taste it. This is the moment where you become the chef, not the recipe-follower. Does it need more brightness? Add another half-tablespoon of lemon juice. Does it need more punch? A tiny pinch more salt wakes up all the flavors.
Sometimes I add that second tablespoon of lemon juice. Sometimes I don’t. It depends on the brightness of my arugula that day, the quality of my lemons, what I’m serving the pesto with. You’re adjusting for your specific ingredients and your palate.
This step teaches you that recipes are guidelines, not gospel. Professional cooks taste constantly and adjust constantly. When you do this, you stop being intimidated by cooking and start trusting yourself.
How to Know You’ve Mastered the Technique
Mastery isn’t about following a recipe perfectly. It’s about understanding the signs that tell you everything is working. Here’s what success looks like:
- The texture is silky and creamy, not grainy or separated – when you run a spoon through it, there’s a glossy sheen and no puddles of oil sitting on top
- It coats the back of a spoon smoothly – when you dip a spoon in and pull it out, the pesto clings to the spoon rather than sliding off immediately
- The color is vibrant green with flecks of Parmesan visible – if your pesto looks dull, brownish, or grayish, the arugula has oxidized and you’ve lost freshness
- The aroma is peppery, garlicky, and nutty—not one note dominates – if it smells mostly of garlic, you used too much; if it smells mostly of nuts, you need more arugula and lemon juice
- One tablespoon of pesto on pasta coats 2-3 servings beautifully – the emulsion is stable enough to cling to whatever you’re serving it with
Common Technique Mistakes and How to Fix Them
- Your pesto separated into oily pools – you either added oil too quickly or your nuts weren’t toasted enough to release adequate emulsifiers. Next time, toast longer and drizzle oil even slower. If this happens mid-process, try pulsing in a tablespoon of water or a squeeze of lemon juice to rebind the emulsion
- It tastes bitter or harsh – your garlic was over-processed or the arugula was bruised before you started. Raw garlic that gets pulverized turns bitter. Always add garlic roughly chopped, and use fresh, crisp arugula. If it’s already bitter, you can’t fix it—make a fresh batch and remember this lesson
- The texture is too thick and pasty – you either didn’t add enough oil or you over-processed after adding it. Pesto should be a pourable sauce, not a paste. Add another tablespoon of olive oil and pulse gently to incorporate
- It’s too loose and slides right off your food – you added too much oil relative to your other ingredients. This pesto works but it’s less efficient. Next time, measure your oil more carefully. You can let it sit in the fridge for 30 minutes—sometimes the texture firms up slightly
- The flavor is flat and one-dimensional – you skipped the tasting and adjusting step. Salt and lemon juice aren’t just seasonings; they’re flavor amplifiers. Always taste and adjust
Practice Variations to Build Your Skill
Mastery comes from repetition with slight variations. Each of these versions teaches you something different about how emulsification works and how ingredients affect the final sauce.
Version 1: The Foundation Builder (Start Here) – Make the classic recipe exactly as written. Your only job is learning the emulsification technique. Don’t change anything. Make it twice this week. The second time will feel easier because your hands will remember the rhythm of the slow oil drizzle.
Version 2: The Substitution Master (Intermediate) – Keep everything the same except swap the walnuts for almonds or pepitas (pumpkin seeds). This teaches you that different nuts have different oil content and fat profiles. You’ll notice almonds create a slightly lighter emulsion while pepitas add an earthier flavor. The technique stays the same; only the ingredient variable changes. Observe how the emulsification speed differs.
Version 3: The Advanced Improviser (Expert) – Make a version that’s 60 percent arugula and 40 percent fresh basil or mint. Or replace half the Parmesan with aged pecorino. Or use half walnuts and half toasted pine nuts. Now you’re teaching your instincts to recognize which flavor combinations work together and how to adjust ratios while maintaining an emulsion. You’re moving from following instructions to understanding principles.
Can I Store Arugula Pesto Recipe?
This is where your emulsion knowledge pays practical dividends. Because you’ve created a stable emulsion, pesto keeps beautifully.
Refrigerator storage: Up to 1 week in an airtight container. The arugula will gradually lose its vibrant green color and the flavors will mellow slightly, but the emulsion stays stable. I press plastic wrap directly onto the surface of the pesto before sealing the container—this prevents oxidation and keeps that bright green color longer.
Freezer storage: Up to 6 months. I recommend freezing pesto in ice cube trays. Once frozen solid (about 4 hours), pop the cubes out and transfer them to a freezer-safe bag labeled with the date. This way you can thaw exactly what you need. One pesto cube equals roughly 1 tablespoon, perfect for a quick pasta dinner or as a finishing sauce for baked haddock or other lean proteins.
The only ingredient that doesn’t freeze beautifully is the garlic—it can develop an off-flavor after a few months. If you’re planning to freeze pesto for longer than 3 weeks, reduce the garlic to 1 clove instead of 2, then add fresh garlic when you thaw and serve.
Pro tip: Don’t freeze pesto with Parmesan already added. Instead, make the pesto without the cheese, freeze it, then stir in freshly grated Parmesan when you thaw it. The cheese tastes fresher and the emulsion stays more stable this way.
Nutrition Information
According to USDA nutrition data, one tablespoon of homemade arugula pesto contains approximately 100 calories, 10 grams of fat (mostly healthy monounsaturated fat from olive oil), 2 grams of protein, and 1 gram of carbohydrates. There’s also about 1 gram of fiber and trace minerals including calcium from the Parmesan, magnesium from the nuts, and folate from the arugula.
Expert’s Nutritional Tip: As a registered dietitian, I want to highlight something important about the nuts in this recipe. Walnuts are among the few plant sources of omega-3 fatty acids (specifically ALA, or alpha-linolenic acid). Just 1/2 cup of walnuts provides about 2.5 grams of ALA, which your body can convert to the longer-chain omega-3s EPA and DHA. This makes arugula pesto more than just a delicious sauce—it’s a functional food that supports heart health and brain function. The key is using quality nuts and not overheating them, which damages these delicate fatty acids.
Real-world serving size: Most people use 1-2 tablespoons of pesto per serving. If you’re serving this over pasta for 4 people, you’ll use about 1/2 cup total, which provides 400-500 calories, 40-50 grams of fat, and 8 grams of protein for the group—roughly 100-125 calories per person from the pesto alone.
What to Serve With Arugula Pesto Recipe?
Now that you’ve mastered the emulsification technique, let’s talk about how to use this sauce to best advantage. The silky, creamy texture you’ve created is meant to cling to food and enhance it, not overshadow it.
Pasta (the classic choice) – Toss with warm pasta and a splash of pasta water to loosen the pesto slightly. The starch in the pasta water helps the emulsion coat every strand. Short pasta like fusilli or rigatoni shows off the pesto better than long strands.
Roasted vegetables – Spread pesto over warm roasted zucchini, eggplant, or bell peppers right after they come out of the oven. The heat helps the emulsion integrate with the vegetables’ surface.
Grilled fish and chicken – Brush finished pesto onto baked haddock or grilled chicken breast as a finishing sauce. The acidity and richness balance the protein beautifully. If you’re making sheet pan Italian chicken, drizzle pesto over the top in the last 5 minutes of cooking.
Spread on crostini or crackers – Pesto as an appetizer shows off your technique. The creamy texture means it spreads beautifully without crumbling or sliding off.
Dolloped on soup – A spoonful of pesto stirred into minestrone or vegetable soup adds richness and brightness simultaneously.
Mixed into grain bowls – Combine with bean and quinoa recipes for a complete, satisfying bowl with excellent nutritional balance.
Make-Ahead Guide for Busy Weeknights
From my experience working with clients who juggle real life, here’s how to integrate pesto into your weekly meal prep:
Sunday preparation: Make a double batch of pesto (2 cups total). Freeze half in ice cube trays. Keep the other half in the refrigerator in an airtight container with plastic wrap pressed directly on the surface.
Monday through Wednesday: Use the refrigerated pesto for quick dinners. Toss with pasta in 5 minutes. Brush on grilled chicken. Stir into leftover grains.
Thursday onward: Thaw a few pesto cubes from the freezer as needed. By Friday night when you’re tired and don’t want to cook, pesto transforms plain grilled fish or pasta into something restaurant-quality.
Advanced prep: Make pesto without the cheese, then freeze it. When you thaw it, add the Parmesan fresh. This keeps the cheese from oxidizing and the pesto tastes brighter. Takes 30 seconds and makes a measurable difference.
Seasonal Variations: How to Adapt Year-Round
Spring and Early Summer: Use the classic recipe with baby arugula and fresh basil. The weather is cool enough that fresh herbs are at peak delicacy.
Mid-Summer: When arugula gets hot and spicy, balance it with more mint or substitute half the arugula with fresh spinach. Add fresh lemon zest (just the colored part, not the white pith) for brightness.
Fall: Switch half the arugula for fresh kale (massaged gently) and add roasted pumpkin seeds instead of walnuts. The earthier nuts work beautifully with roasted fall vegetables.
Winter: Use frozen arugula (thawed and squeezed dry) combined with fresh herbs from your grocery store’s hot house selection. Add a pinch of nutmeg to the pesto—it sounds odd but adds warmth that works beautifully in winter cooking.
Arugula Pesto Recipe
Ingredients
Method
- Pour your walnuts or pecans into a large skillet and set the heat to medium. This is the first critical moment. You're not trying to brown the nuts; you're gently warming them to release their natural oils without damaging them with high heat. Stir frequently—this means every 30 seconds or so. Toasting usually takes 3 to 5 minutes, and you'll know it's working when the kitchen smells nutty and rich. Why toast them? Raw nuts contain compounds that inhibit nutrient absorption. Toasting also makes their flavors more pronounced and concentrated. Plus, when nuts are warm, the oil releases more easily from the cell walls, creating a better emulsion base. This is the foundation of everything that follows. Transfer the toasted nuts to your food processor and let them cool for a few minutes. Warm nuts process into nut butter too quickly, which isn't what we want. We need them warm enough to release oils but cool enough to stay in pieces that will blend gradually with the other ingredients.
- Once the nuts have cooled slightly, add the arugula, freshly grated Parmesan, roughly chopped garlic, and that initial tablespoon of lemon juice along with your salt. This is where you're building layers—you're combining your emulsifiers (nuts and cheese) with your flavor-builders (greens and acid) before introducing the oil. Pulse the food processor a few times at this stage. You're not trying to create a smooth paste yet. You want everything chopped and broken down enough that the particles can distribute evenly, but you're not making baby food. This usually takes 6 to 8 pulses. The arugula wilts down dramatically once you start processing it. That peppery green that seemed like a lot will compress into just a thin layer of flavor. This is exactly what you want—you're concentrating the taste.
- Now comes the technique moment that separates good pesto from broken pesto. Turn your food processor on and let it run continuously. While it's running, drizzle your extra-virgin olive oil in slowly—we're talking a thin, steady stream, not a pour. This is not the time to rush. Think of it like the food processor is holding a secret, and you're coaxing it out slowly. This process should take about 45 seconds to 1 minute total. Yes, you'll feel like this is taking forever. That's exactly right. As the oil drizzles in, the food processor is spinning and the protein-rich base you created is wrapping around each tiny oil droplet. The mixture gradually becomes creamy and thick. If you dump all your oil in at once, the emulsion breaks. You'll end up with a grainy, oily mess that looks curdled. If you stop too early, you'll have something too thick that doesn't coat food properly. The slow drizzle is the secret. By the time you've added all the oil, your pesto should look silky, creamy, and mostly smooth with just a tiny bit of texture remaining. This is the sweet spot.
- Transfer your pesto to a bowl and taste it. This is the moment where you become the chef, not the recipe-follower. Does it need more brightness? Add another half-tablespoon of lemon juice. Does it need more punch? A tiny pinch more salt wakes up all the flavors. Sometimes I add that second tablespoon of lemon juice. Sometimes I don't. It depends on the brightness of my arugula that day, the quality of my lemons, what I'm serving the pesto with. You're adjusting for your specific ingredients and your palate. This step teaches you that recipes are guidelines, not gospel. Professional cooks taste constantly and adjust constantly. When you do this, you stop being intimidated by cooking and start trusting yourself.
Nutrition
Notes
Tried this recipe?
Let us know how it was!FAQs
Why is my pesto grainy instead of smooth?
You added oil too quickly. The proteins in your nuts and cheese couldn’t wrap around all those oil droplets fast enough, so they clumped together. Next time, make a fresh batch and remember: the drizzle matters more than the ingredients. Go slowly enough that it feels like it’s taking forever. That’s the right speed. If you want to salvage the current batch, try pulsing in a tablespoon of water or lemon juice—sometimes this re-emulsifies the broken sauce.
Can I use a blender instead of a food processor?
You can, but it’s trickier. Blenders are more powerful and can heat up the pesto slightly, which can break the emulsion. If you use a blender, go on the lowest speed setting and work in short pulses rather than continuous blending. A food processor gives you more control and is really the better choice for learning this technique. Once you’re confident, you can experiment with other equipment.
Should I use raw garlic or roasted?
Raw garlic gives pesto its signature sharp, peppery bite. Roasted garlic creates a sweeter, milder version. Both work—it depends on your preference. I use raw garlic in spring and early summer when I want brightness. In fall and winter, I sometimes switch to roasted garlic for a richer, warmer flavor profile. If you choose roasted, use 3 cloves instead of 2 since roasting mellows the flavor.
What if my arugula is wilted or less than fresh-looking?
Don’t use it. The bitterness that comes with wilted arugula will carry through the entire sauce and you can’t fix it. Fresh, crisp arugula is essential. If you don’t have good arugula, make a different pesto with basil or spinach. Your pesto is only as good as your base ingredient.
Can I make pesto in a mortar and pestle instead?
Yes, and this is actually the traditional method. A mortar and pestle teaches you the technique more intimately because you feel the emulsification happening. Start with the nuts, grind them gently, add the other ingredients in stages, and incorporate oil drop by drop. It takes longer but your hands literally feel the texture changing. This is how pesto was made for centuries before food processors existed. Try it once—it’s meditative and teaches your body what proper emulsification feels like.
More Recipes Using This Technique
- Ahi Tuna Marinade Recipe – uses the same slow oil-drizzling emulsification principle to create a marinade that clings to delicate fish
- Roasted Zucchini Recipe – pairs beautifully with pesto and teaches you how to layer complementary techniques in a single meal
- Brie Bites – shows how emulsification works in a completely different context, with cheese as the base
Your New Cooking Superpower
You’ve now learned something that professional chefs spend months mastering. You understand emulsification—what it is, why it matters, and how to recognize when you’re doing it right. This isn’t just about making pesto. This is about understanding how fat and water bind together in the kitchen. This knowledge transfers to marinades, dressings, sauces, and techniques you haven’t even encountered yet.
The next time you’re making a vinaigrette or attempting a hollandaise or trying to create any sauce that seems to be separating, you’ll remember this moment. You’ll slow down, think about emulsification, and instinctively know what to do.
That’s the real skill. Not following a recipe. Understanding the principle behind it.
Make this pesto three times this month. Taste the difference between versions. Notice how your hands learn the rhythm of that slow oil drizzle. Feel how the texture changes. Listen to the food processor. Trust your instincts when you’re adjusting for salt and lemon juice.
This is how you become a confident cook. One emulsion at a time.
Happy cooking!